For more than two years, I’ve been working with WinGet daily to monitor and maintain the apps on my Windows 10 and 11 PCs. For those not already in the know, WinGet is the built-in, command-line interface to Microsoft’s Windows Package Manager service. It works in both PowerShell and Command Prompt with equal facility.
WinGet is designed to enable users to “discover, install, upgrade, remove and configure applications on Windows 10 and 11 computers,” according to Microsoft Learn. In my experience, WinGet is helpful for checking and updating most applications that run on Windows.
Please note: WinGet is included with Windows 10 version 1709 and later, and all versions of Windows 11 as the App Installer. If you’re running an earlier version of Windows 10, visit the WinGet home page at GitHub. There, click the Latest button under “Releases” at right, and download the item named “Microsoft.DesktopAppInstaller…msixbundle” (the missing characters identify Microsoft Store apps). Double-click on this item to install it.
(Don’t worry: if you do this on a newer Windows version, it will inform you, “The App Installer is already installed.”)
Exploring a PC using WinGet
Using WinGet starts with opening an administrative command line session. Press the Windows key + X, then pick Terminal (Admin) or PowerShell (Admin) from the pop-up menu. (I use PowerShell and will use it for examples throughout this story.) Given that WinGet runs in PowerShell, it uses straightforward PowerShell syntax to provide information or perform actions.
WinGet tells you about itself if you enter the command:
winget --info
(Although I’ve followed Microsoft’s lead in labeling this command “WinGet,” the command line doesn’t care about capitalization.)
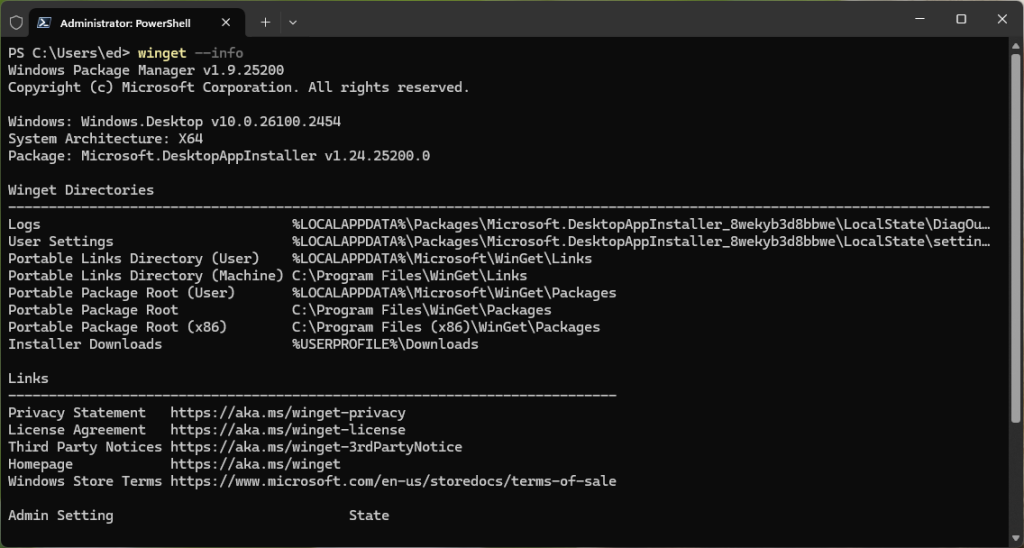
As you can see in Figure 1, the output from this command shows the running version of Windows Package Manager, along with the OS Build number, system architecture, Microsoft.DesktopAppInstaller version, and symbol values for WinGet directories, links, and Admin Settings.

Figure 1: Output from WinGet’s info command tells you about the system, plus WinGet-related software and settings.
Ed Tittel / IDG
This information can be helpful, but it’s not terribly interesting, nor have I found it super-useful in day-to-day WinGet use and troubleshooting.
Things get more interesting with WinGet’s two information display subcommands: list and show. The list subcommand shows what’s currently installed on the target PC, while the show subcommand searches an online database of available packages to show you information about matching search hits.
With no qualifiers or queries, winget list shows a list of every item installed on your PC (177 items on an up-to-date Windows 11 production PC; 339 items on a heavily used production Windows 10 PC). All standard executables and Microsoft Store apps are included in this count.
Winget show won’t do anything unless you provide it with a search string. It’s normally used to search for specific packages, or to see if they exist. Try it with search strings such as windows, power, powershell and so forth. It’s soon obvious that this is a more focused tool. I use it primarily when WinGet tells me a package needs an upgrade. It helps me find complete IDs, version numbers, and publisher, and tells me where it came from. (That usually means WinGet’s package repository or the Microsoft Store.)
The winget search command can be more helpful than show if you’re looking for something specific. It lists all items that include the search string. Thus, if you use the same strings recommended in the preceding paragraph, you’ll get more — and more interesting — results.
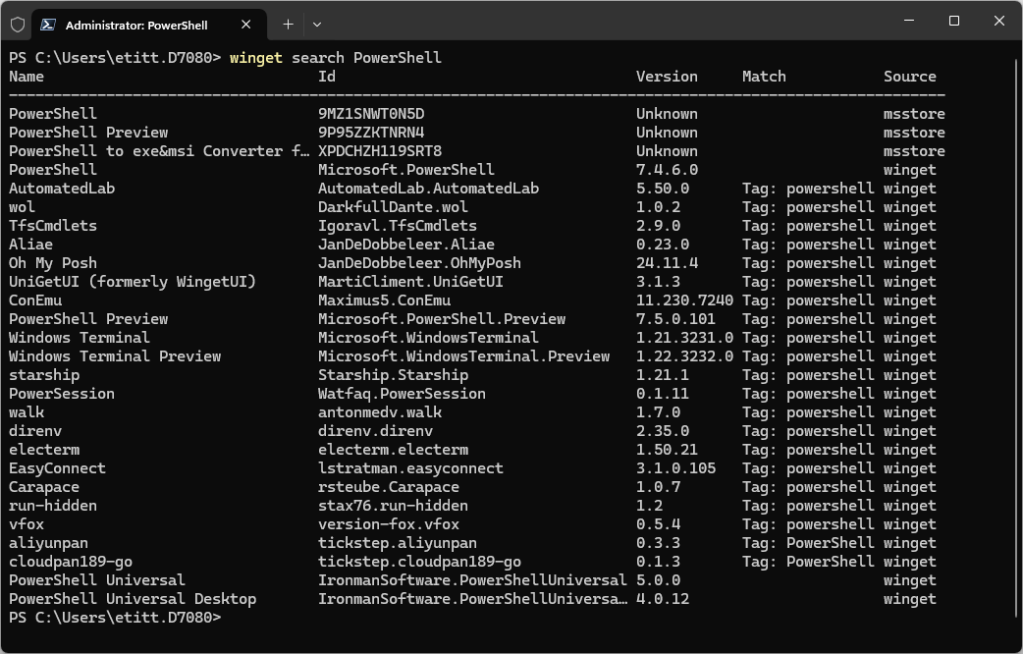
Figure 2 shows the output for winget search PowerShell as an illustration. (It shows items with PowerShell in their names, IDs, and tags, so it’s more inclusive.)

Figure 2: Matching on ‘PowerShell’ is especially useful for tagged items, particularly Windows Terminal and related applications.
Ed Tittel / IDG
WinGet’s star subcommand: upgrade
My favorite among the WinGet subcommands is the upgrade item. It offers insight into available upgrades and offers various ways to perform upgrades on a Windows PC. Indeed, three variants of winget upgrade are likely to be both useful and informative:
winget upgrade
winget upgrade --all
winget upgrade --all --include-unknown
By itself, winget upgrade (no additional arguments or modifiers) simply tells you if newer versions of installed packages are available. Figure 3 shows an example of this command from one of my production level test PCs, with some items in need of update. Notice that the Version column identifies the version that’s currently installed. The Available column identifies the corresponding new (updated) version one could apply in its stead, if desired.

Figure 3: Seven updates are available for the target PC, as shown.
Ed Tittel / IDG
The next command, winget upgrade --all, tells WinGet to update all items from the upgrade list for which a version number is known. In Figure 3, all items have values in the Version column. Note further that all packages shown come from the default WinGet package repository (named winget in Figure 3).
The third command, winget upgrade --all --include-unknown, tells WinGet to update all items even if the version column is blank. In general, this command is more useful because it involves less additional work. Thus, I use it as my go-to for all winget upgrade commands, just to make sure I cover everything.
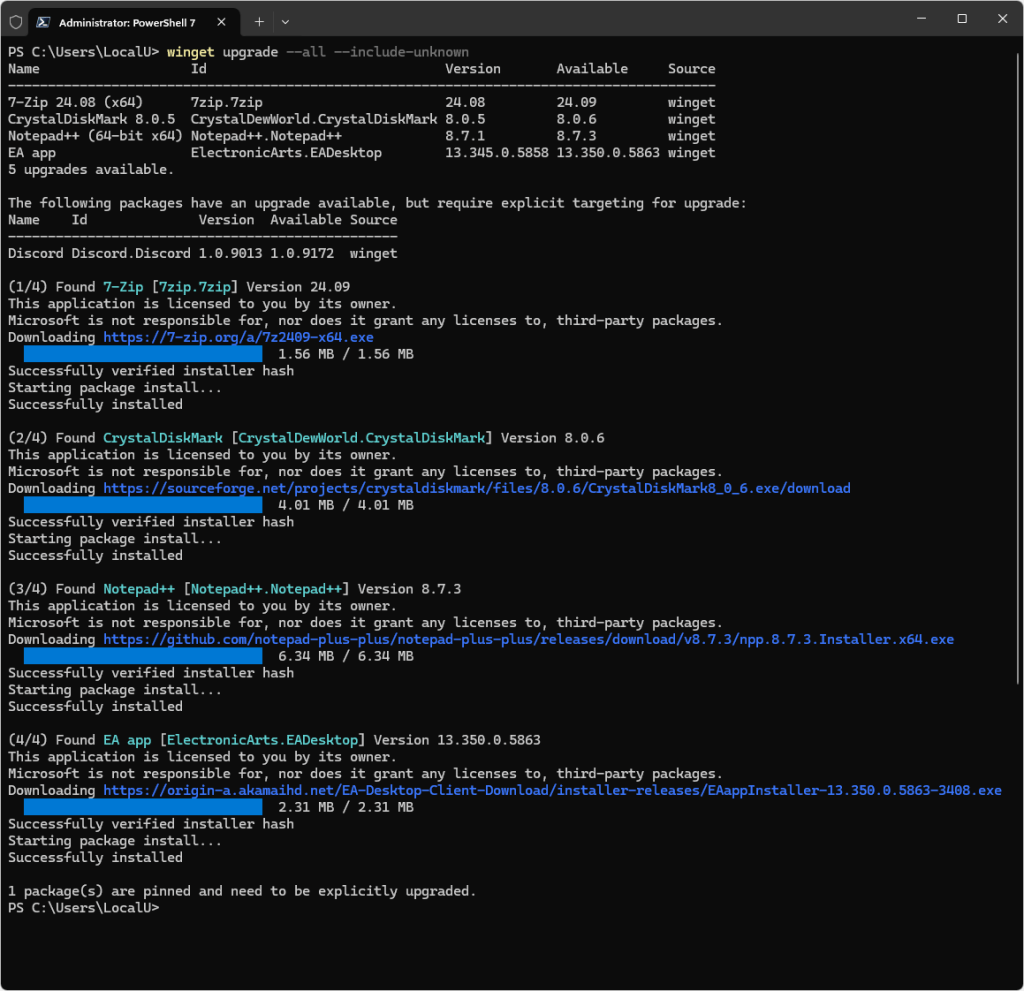
Figure 4 shows results after running that catch-all command on the target PC. (I’ll have more to say about this figure later.)

Figure 4: On this production PC, WinGet finds and installs four upgrades, but leaves the fifth alone.
Ed Tittel / IDG
Note that you’ll sometimes see installer windows and even PowerShell or Command Prompt sessions open and close as WinGet goes through the necessary motions involved in performing those updates. Note further: when updating web browsers — Edge, Chrome, or Firefox, for example — if the browser is running when you run WinGet, you must relaunch that browser manually before the update fully completes. If it’s closed, it completes on its own. (WinGet always applies an abundance of caution when it encounters running processes.)
Running winget upgrade again after performing all updates shows nothing left to do. In Figure 5, the message “No installed package found matching input criteria” translates into “Nothing to upgrade.”

Figure 5: “No installed package found matching input criteria” means “Nothing to upgrade.”
Ed Tittel / IDG
About pinned applications (and other experimental WinGet features)
If you look back at Figure 4, you’ll see the sentence “The following packages have an upgrade available, but require explicit targeting” fairly near the top, with Discord listed below. What does that mean, and why does this happen? Some application developers, including Discord, use advanced WinGet features — pinning in this case (look back at the final line of Figure 4) — to prevent unwanted changes to the Discord app. It usually updates inside the app so this approach (mostly) prevents WinGet from getting involved.
On the other hand, you can always use WinGet to uninstall an app, and then use WinGet one more time to reinstall. For Discord, that command sequence looks like this:
winget uninstall Discord.Discord
winget install Discord.Discord
(Note at the head of Figure 4, the ID value for Discord is Discord.Discord, so that’s how we specify these commands.)
The first command removes (the old version of) Discord; the second command installs (the new version of) Discord. It’s what I call a remove-replace operation, and it works pretty well for general WinGet troubleshooting, too. I’ve also used it recently for Zoom Workplace, various Teams versions, and other occasional vexations.
For the record, the pin command is a relatively new subcommand for WinGet. It first appeared in general release in July 2024. According to Microsoft Learn, “the winget pin command allows you to limit the Windows Package Manager from upgrading a package to specific ranges of versions, or it can prevent it from upgrading a package altogether.”
Another special qualifier, namely --include-pinned, lets you override this restriction. But because Discord is the only item in my stable of apps that uses this restriction, it’s not worth adding to my go-to command string.
When the upgrade command fails or falls short
Sometimes, WinGet updates don’t clear the items that appear when you enter the winget upgrade command by itself. That means something remains on your PC that WinGet couldn’t handle. Through experience, I’ve observed the following possibilities, each of which has its own potential solution:
Multiple copies of the same app or application are resident. If you have multiple installations of the same program, only one is likely to be current and up to date. Unless you require older versions, the simplest fix is to uninstall them so only the current, updated version remains present.
I’ve seen this happen with PowerShell, for example, where some of my PCs retained version 7.2.5 even when 7.4.5 or 7.4.6 (the current version as I write this) was also present. Using Programs and Features (or some equivalent third-party tool like Revo Uninstaller Free), you can find and uninstall out-of-date versions.
Strange programs that you’ve never seen before and don’t need show up. Case in point: occasionally an item named “Teams machine-wide installer” shows up on my PCs. It’s something Microsoft uses that apparently gets left behind from time to time. Uninstalling this item causes no noticeable issues with Teams, and it removes the item from further upgrade consideration.
Current WinGet packages aren’t available for some apps. One of WinGet’s limitations is that it only works with items registered in its package database. You may need to visit the app publisher’s website to find current updates that aren’t registered with WinGet.
In the past, I’ve covered using third-party automated tools such as UpdateStar and Patch My PC to keep apps updated in Windows 10 and 11. These and other update scanners may find items in need of updating on your PC that WinGet doesn’t handle. On my PCs, that includes applications such as Nitro Pro (a PDF reader/editor), Amazon Kindle (for which only an outdated package is available via WinGet), FileZilla, various Intel tools (e.g., Intel Driver & Support Assistant), and more.
If you’re willing to research your applications and their sources for updates, you can almost always find a way to get them updated. That said, WinGet cannot handle all apps on its own. Many or most of them, yes; all of them, no.
A WinGet for all seasons
As you become familiar with WinGet, you’ll find it to be a terrific tool for helping keep Windows systems (and reference or canonical Windows images for automated deployments) up to date. It’s become my tool of choice for keeping apps updated because it’s fast and easy to use. Although I still use UpdateStar to scan my systems to tell me what needs updates and Patch My PC to handle a handful of things that WinGet can’t, WinGet remains my go-to tool to keep systems current. I use WinGet every day; the other tools weekly, at most.
If you try it for yourself, I believe you’re likely to continue using WinGet for the very same reasons. See Microsoft’s WinGet documentation for a complete list of commands and options.
One final note: If you know someone who could benefit from WinGet but isn’t comfortable using the command line, see this article by Chris Hoffman detailing how to use WingetUI, a package that wraps a graphical interface around WinGet.
This article was originally published in January 2023 and updated in December 2024.

