Overview
Cloud Spanner is a highly scalable database that combines unlimited scalability with relational semantics, strong consistency, schemas, and SQL providing 99.999% availability in one easy solution. Hence, it’s suitable for both relational and non-relational workloads. With Spanner change streams, users can track and stream out changes (inserts, updates, and deletes) from their Spanner database in near real-time.
Change streams provide a flexible, scalable way to stream data changes to other services. Common use cases include:
-
Replicating Spanner data changes to a data warehouse, such as BigQuery, for analytics.
-
Triggering application logic based on data changes sent to a message queue, such as Pub/Sub or Apache Kafka.
-
Storing data changes in Google Cloud Storage, for compliance or archival purposes.
You can integrate with Spanner change streams in a variety of ways. You can use our recently launched Cloud Spanner Change Streams Kafka connector to stream Cloud Spanner data into Kafka, as we will discuss below in this blog post. You can also use theChange Streams Dataflow connector to consume and forward Cloud Spanner change data to a variety of sinks in addition to Kafka. We also provide Dataflow templates, which are pre-built, easy-to-use pipelines that implement common use cases. In addition, you can also integrate with Spanner change streams using the Spanner API.

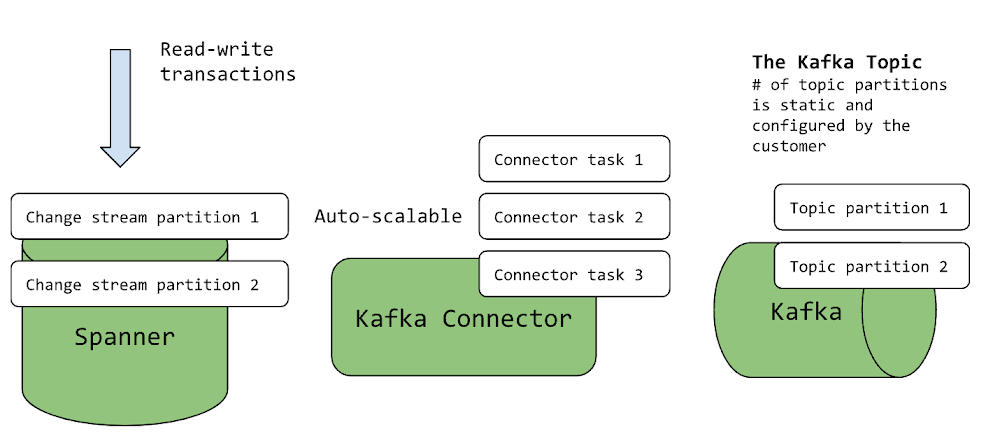
With our recently launched Cloud Spanner Change Streams Kafka connector based on Debezium, you can seamlessly publish Spanner change stream records to Kafka. With this connector, you don’t have to manage the change streams partition lifecycle, which is necessary when you use the Spanner API directly.
The Kafka connector produces a change event for every row-level modification and sends change event records into a separate Kafka topic for each change stream-tracked table.
Getting Started with the Kafka Connector
Let’s take an example application called Orders that is responsible for creating and updating orders in the system. A separate downstream service called Fulfillment is responsible for fulfilling newly created orders. We’ll want to send each newly-created order downstream so that it can be processed by Fulfillment.
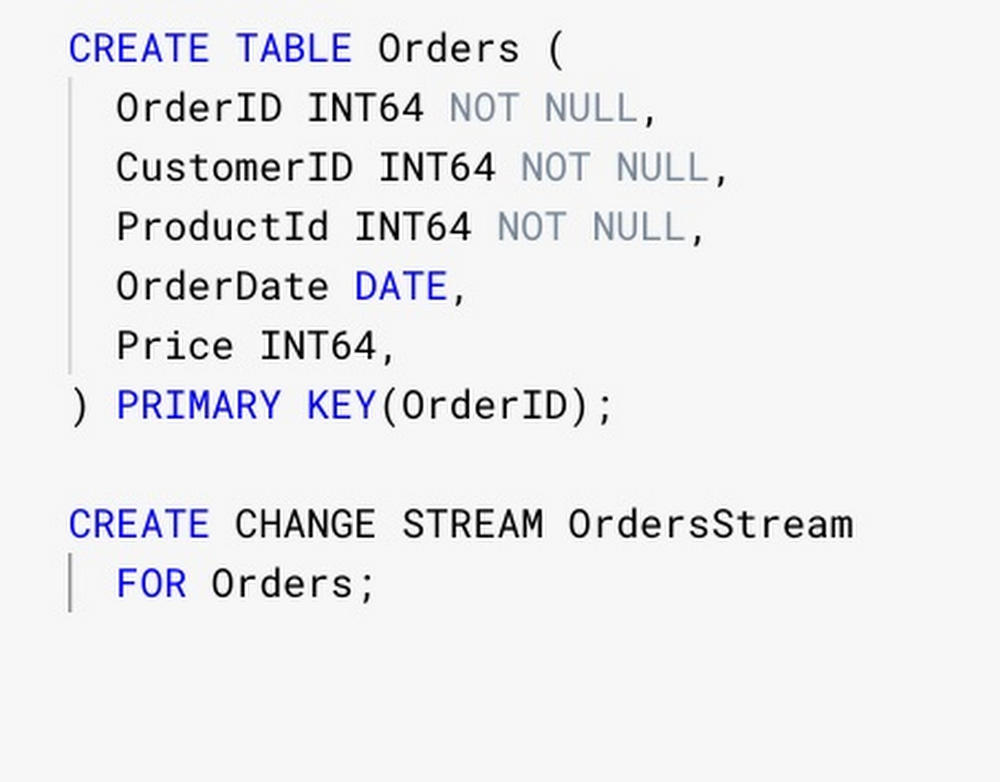
Now suppose the Orders application is built on Spanner and has a table called Orders.
To send these new orders to Fulfillment, we will go through the following steps, outlined in detail below:
1. Prerequisites
2. Create the Orders table in Spanner
3. Start required Kafka services
4. Run the Kafka connector against the Spanner database
5. Inspect output Kafka topics
Prerequisites
1. Verify that Docker is installed and running on your machine.
docker ps.
2. Download a JSON key for the service account that has access to query the Cloud Spanner database. To learn more about this process, see https://cloud.google.com/iam/docs/keys-create-delete.
3. Install HTTPie, an open-source command-line HTTP client. Run the below command to install HTTPie on Linux machines.
sudo apt install httpie.
Please see HTTPie documentation for more information on how to install HTTPie on non-Linux machines.
The rest of this tutorial assumes that you are running Docker on a Linux machine. To work with Docker on non-Linux machines, see the Docker CLI tutorial.
Create the Spanner database in the Google Cloud console
Create a database containing the Orders table and a change stream on that table.
If you’re working with the GoogleSQL dialect, your database schema should look like the following schema below. Otherwise, the PostgreSQL interface will have slightly different PostgreSQL-compatible syntax.
Start required Kafka Services
Now you can run the Spanner Kafka connector on the change stream that you just created. The connector will start streaming change stream records from Spanner and publish them into a Kafka topic. The downstream Fulfillment Service will then be able to pull order records from the Kafka topic for order fulfillment.
Running the Kafka connector requires three separate services:
-
Zookeeper
-
Kafka
-
Kafka Connect.
In this tutorial, we will use Docker and Debezium container images to run these three services.
Start Zookeeper
Zookeeper is the first process you must start.
1. To run Zookeeper in detached mode on a Linux machine, run the following command:
- code_block
- [StructValue([(u’code’, u’docker run -d -it –rm –name zookeeper -p 2181:2181 -p 2888:2888 -p rn3888:3888 debezium/zookeeper:latest’), (u’language’, u”), (u’caption’, <wagtail.wagtailcore.rich_text.RichText object at 0x3efa9f388e90>)])]
2. You can inspect the zookeeper logs by running the following:
- code_block
- [StructValue([(u’code’, u’docker logs zookeeper’), (u’language’, u”), (u’caption’, <wagtail.wagtailcore.rich_text.RichText object at 0x3efa9f388450>)])]
You should see the Zookeeper logo and the words “Starting Server” in the output logs:

Start Kafka
After starting Zookeeper, Kafka is the second process you must start.
1. To run Kafka in detached mode, run the following command:
- code_block
- [StructValue([(u’code’, u’docker run -it -d –rm –name kafka -p 29092:9092 –link rnzookeeper:zookeeper debezium/kafka:latest’), (u’language’, u”), (u’caption’, <wagtail.wagtailcore.rich_text.RichText object at 0x3efa9f633310>)])]
2. You can inspect the kafka logs by running the following:
- code_block
- [StructValue([(u’code’, u’docker logs kafka’), (u’language’, u”), (u’caption’, <wagtail.wagtailcore.rich_text.RichText object at 0x3efa9f1e2650>)])]
You should see “[KafkaServer id=1] started” in the output logs:

Start Kafka Connect
Finally, you should start the Kafka Connect service. Debezium’s container image for Kafka Connect comes with the Spanner connector pre-installed.
1. To run Kafka in detached mode, run the following command:
- code_block
- [StructValue([(u’code’, u’docker run -d -it –rm –name connect -p 8083:8083 -e GROUP_ID=1 -e rnCONFIG_STORAGE_TOPIC=my_connect_configs -e rnOFFSET_STORAGE_TOPIC=my_connect_offsets -e rnSTATUS_STORAGE_TOPIC=my_connect_statuses –link zookeeper:zookeeper rn–link kafka:kafka debezium/connect:latest’), (u’language’, u”), (u’caption’, <wagtail.wagtailcore.rich_text.RichText object at 0x3efa9f1e2fd0>)])]
2. Verify that Kafka Connect service started successfully.
- code_block
- [StructValue([(u’code’, u’docker logs connect’), (u’language’, u”), (u’caption’, <wagtail.wagtailcore.rich_text.RichText object at 0x3efa9f1e25d0>)])]
You should see “Starting connectors and tasks” in the output logs:
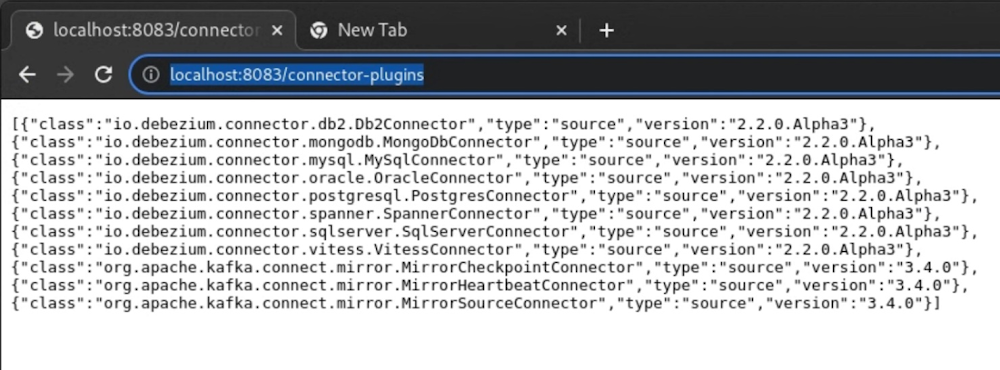
3. View the installed Spanner connector using the Kafka Connect REST API.
The Kafka Connect service supports a REST API for managing connectors. By default, the Kafka Connect service runs on port 8083. You should now be able to view the connector resources at http://localhost:8083/connector-plugins. You should see the following:
Run the Kafka Connector
1. Create and start the Kafka connector.
To create the connector, create a file titled “source.json” with the following content and send it to the http://localhost:8083. You can use the below commands as reference.
- code_block
- [StructValue([(u’code’, u’echo ‘{rn “name”: “OrdersConnector”,rn “config”: {rn “connector.class”: rn “io.debezium.connector.spanner.SpannerConnector”,rn “gcp.spanner.change.stream”: “OrdersStream”,rn “gcp.spanner.project.id”: “OrdersProject”,rn “gcp.spanner.instance.id”: “orders-instance”,rn “gcp.spanner.database.id”: “orders-database”,rn “tasks.max”: “1”,rn “gcp.spanner.credentials.json”: “<Full JSON Key>” }rn}’ > source.jsonrnrnhttp POST http://localhost:8083 < source.json’), (u’language’, u”), (u’caption’, <wagtail.wagtailcore.rich_text.RichText object at 0x3efa9f809590>)])]
2. Verify that the connector is created successfully.
You should see the following HTTP response:
- code_block
- [StructValue([(u’code’, u’HTTP/1.1 201 CreatedrnContent-Length: 2846rnContent-Type: application/jsonrnDate: Thu, 20 Apr 2023 22:45:07 GMTrnLocation: http://localhost:8083/connectors/OrdersConnectorrnrn{rn “config”: {rn “connector.class”: rn “io.debezium.connector.spanner.SpannerConnector”,rn “gcp.spanner.change.stream”: “OrdersStream”,rn “gcp.spanner.credentials.json”: “<Full JSON Key>”,rn “gcp.spanner.database.id”: “orders-database”,rn “gcp.spanner.instance.id”: “orders-instance”,rn “gcp.spanner.project.id”: “cloud-spanner-backups-loadtest”,rn “name”: “OrdersConnector”,rn “tasks.max”: “1”rn },rn “name”: “OrdersConnector”,rn “tasks”: [],rn “type”: “source”rn}’), (u’language’, u”), (u’caption’, <wagtail.wagtailcore.rich_text.RichText object at 0x3efa9f809710>)])]
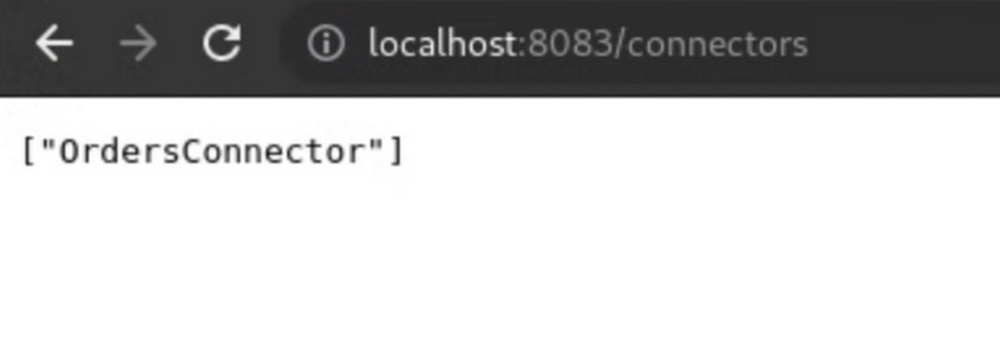
3. Verify that the connector is listed at the Kafka Connect URL endpoint:
Inspect Kafka Connector Output
The Kafka connector creates output topics when records are streamed into the output topic for the first time.
1. In the Google Cloud Console, insert a record into the Orders table.
- code_block
- [StructValue([(u’code’, u’INSERT INTO ORDERS (OrderId, CustomerId, ProductId, OrderDate, Price) VALUES (1, 1, 1, “2023-04-21″, 3);’), (u’language’, u”), (u’caption’, <wagtail.wagtailcore.rich_text.RichText object at 0x3efab4d57410>)])]
2. Verify that the output Kafka topic is created.
We can list the current output topics with the current command:
- code_block
- [StructValue([(u’code’, u’docker run -it –rm –link zookeeper:zookeeper –link kafka:kafka debezium/kafka:latest list-topics’), (u’language’, u”), (u’caption’, <wagtail.wagtailcore.rich_text.RichText object at 0x3efa9f809e50>)])]
We can see that an output topic named OrdersConnector.Order was created. The first part of the topic name is the connector name, and the second part is the table name. The other topics besides the output topic are connector metadata topics.

3. View records in the output topic.
To inspect the record in the output topic, we will run the following command:
- code_block
- [StructValue([(u’code’, u’docker run -it –rm –link zookeeper:zookeeper –link kafka:kafka debezium/kafka watch-topic -a OrdersConnector.Orders’), (u’language’, u”), (u’caption’, <wagtail.wagtailcore.rich_text.RichText object at 0x3efa9f7e11d0>)])]
You should see the newly inserted order in the output terminal:

Final Steps
1. To stop running the connector, issue the following command:
- code_block
- [StructValue([(u’code’, u’http DELETE http://localhost:8083/connectors/OrdersConnector’), (u’language’, u”), (u’caption’, <wagtail.wagtailcore.rich_text.RichText object at 0x3efa9f7e1cd0>)])]
You should see the following:
- code_block
- [StructValue([(u’code’, u’HTTP/1.1 204 No ContentrnDate: Thu, 20 Apr 2023 22:57:45 GMTrnServer: Jetty(9.4.48.v20220622)’), (u’language’, u”), (u’caption’, <wagtail.wagtailcore.rich_text.RichText object at 0x3efa9f7e1e50>)])]
What’s Next
We’re excited about all the new use cases that Spanner change streams is starting to enable. In this post, we just looked at how you can stream changes from Spanner to downstream systems in near real-time using the Kafka connector. Change streams also supports near real-time streaming to BigQuery, Google Cloud Storage, and Pub/Sub. Plus, you can build your own connectors to other systems with Dataflow or by directly integrating with our API.
To learn more about Spanner change streams and the Kafka Connector, you can explore the change streams overview and the Kafka Connector overview.
The code for the Kafka connector is available as open source in the Debezium Github repository. You can also access the Kafka Connector via the ZIP files or Docker image.

