Google Cloud BigQuery is a key service that helps you create a Data Warehouse that provides the scale and ease of querying large data sets. Let’s say that you have standardized on using BigQuery and have set up data pipelines to maintain the datasets. The next question would be to determine how best to make this data available to applications. APIs are often the way forward for this and what I was looking to experiment with is to consider a service that helps me create an API around my data sources (BigQuery in this case) and do it easily.
In this blog post, we shall see how to use Hasura, an open-source solution, that helped me create an API around my BigQuery dataset.
The reason to go with Hasura is the ease with which you can expose your domain data via an API. Hasura supports a variety of data sources including BigQuery, Google Cloud SQL and AlloyDB. You control the model, relationships, validation and authorization logic through metadata configuration. Hasura consumes this metadata to generate your GraphQL and REST APIs. It’s a low-code data to API experience, without compromising any of the flexibility, performance or security you need in your data API.
While Hasura is open-source, it also has fully managed offerings on various cloud providers including Google Cloud.
Pre-requisites
You need to have a Google Cloud Project. Do note down the Project Id of the project since we will need to use that later in the configuration in Hasura.
BigQuery dataset – Google Trends dataset
Our final goal is to have a GraphQL API around our BigQuery dataset. So what we need to have in place is a BigQuery dataset. I have chosen the Google Trends database that is made available in the Public Datasets program in BigQuery. This is an interesting dataset that makes available (both US and Internationally), the top 25 overall or top 25 rising queries from Google Trends from the past 30 days.
I have created a sample dataset in BigQuery in my Google Cloud project named ‘google_trends’ and have copied the dataset and the tables from the bigquery-public-data dataset. The tables are shown below:

Google Trends dataset
What we are interested in is the international_top_terms that helps me to see the trends across countries that are supported in the Google Trends dataset that has been made available.
The schema for the international_top_terms dataset schema is shown below:
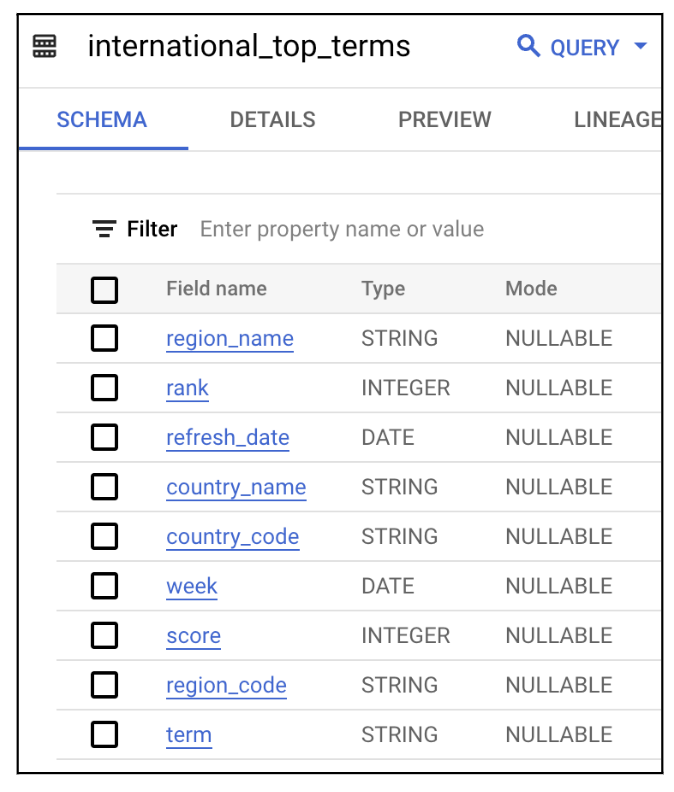
International Top Terms table schema
A sample BigQuery query (Search terms from the previous day in India) that we eventually would like to expose over the GraphQL API is shown below:
- code_block
- <ListValue: [StructValue([(‘code’, “SELECTrnDISTINCT termrnFROMrn`YOUR_DATASET_NAME.international_top_rising_terms`rnWHERErnrefresh_date = DATE_SUB(CURRENT_DATE(), INTERVAL 1 DAY)rnAND country_code = ‘IN’”), (‘language’, ”), (‘caption’, <wagtail.rich_text.RichText object at 0x3eb2283b14f0>)])]>
If I run this query in the BigQuery workspace, I get the following result (screenshot below):
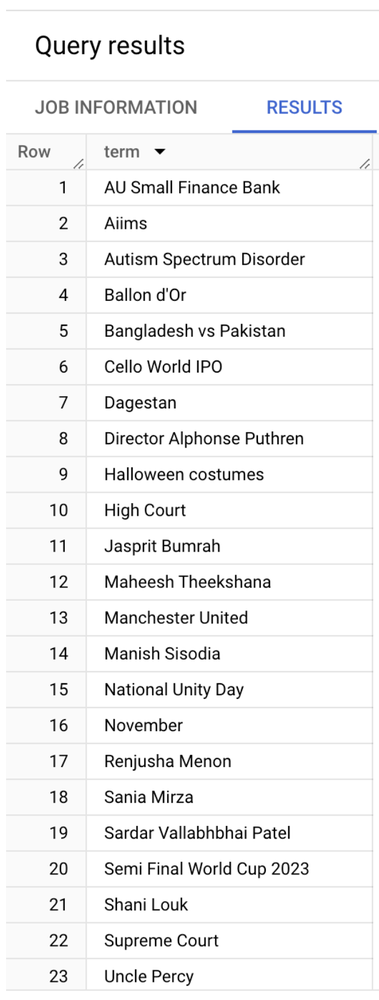
International Trends sample data
Great ! This is all we need for now from a BigQuery point of view. Remember you are free to use your own dataset if you’d like.
Service account
We will come to the Hasura configuration in a while, but before that, do note that the integration between Hasura and Google Cloud will require that we generate a service account with the right permissions. We will provide that service account to Hasura, so that it can invoke the correct operations on BigQuery to configure and retrieve the results.
Service account creation in Google Cloud is straightforward and you can do that from the Google Cloud Console → IAM and Admin menu option.
Create a Service account with a name and description.
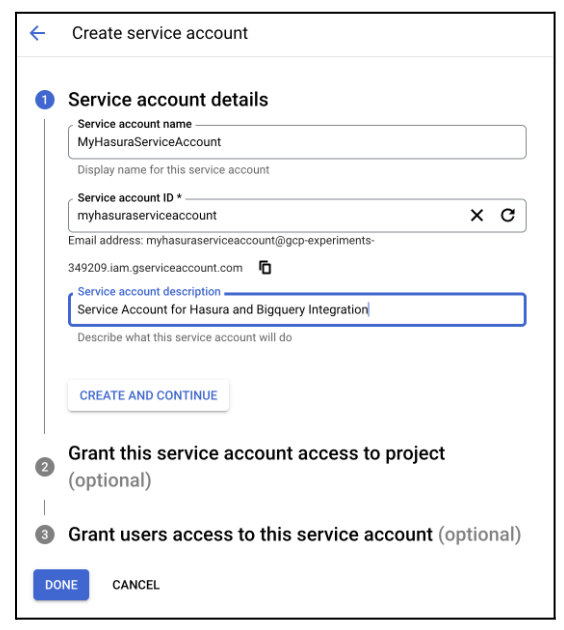
Service Account Creation
In the permissions for the service account, ensure that you have the following Google Cloud permissions, specific to BigQuery:
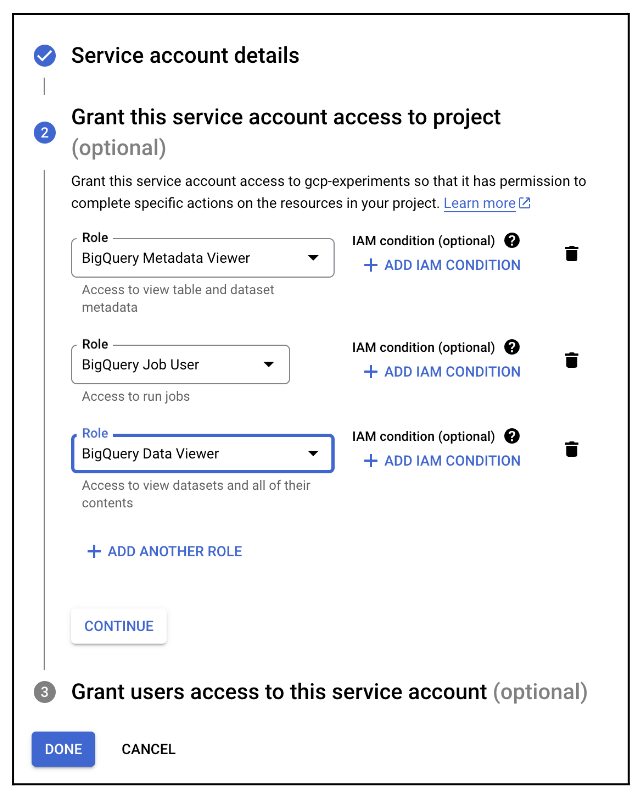
Service Account Permissions
Once the service account is created, you will need to export this account via its credentials (JSON) file. Keep that file safely as we will need that in the next section.
This completes the Google Cloud part of the configuration.
Hasura configuration
You need to sign up with Hasura as a first step. Once you have signed it, click on New Project and then choose the Free Tier and Google Cloud to host the Hasura API Layer, as shown below. You will also need to select the Google Cloud region to host the Hasura service in and then click on the Create Project button.
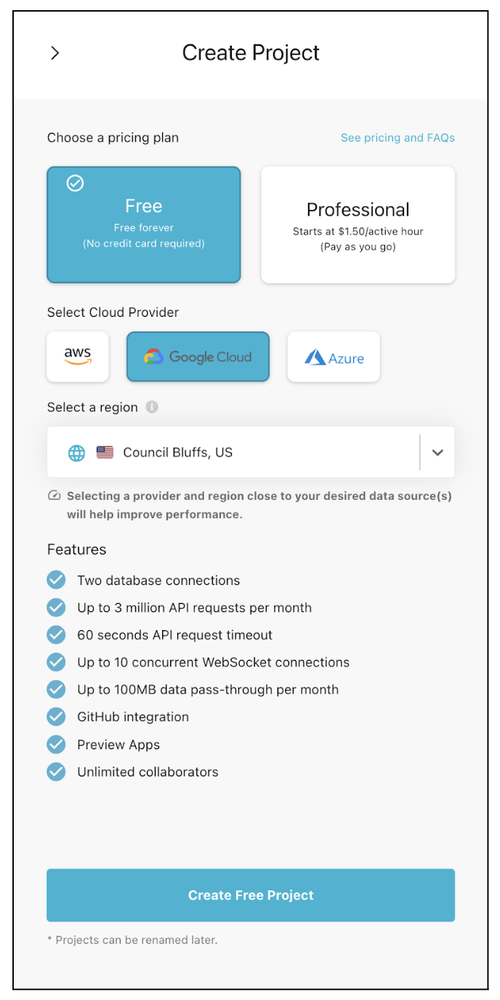
Hasura Project Creation
Setting up the data connection
Once the project is created, you need to establish the connectivity between Hasura and Google Cloud and specifically in this case, set up the Data Source that Hasura needs to configure and talk to.
For this, visit the Data section as shown below. This will show that currently there are no databases configured i.e. Databases(0). Click on the Connect Database button.
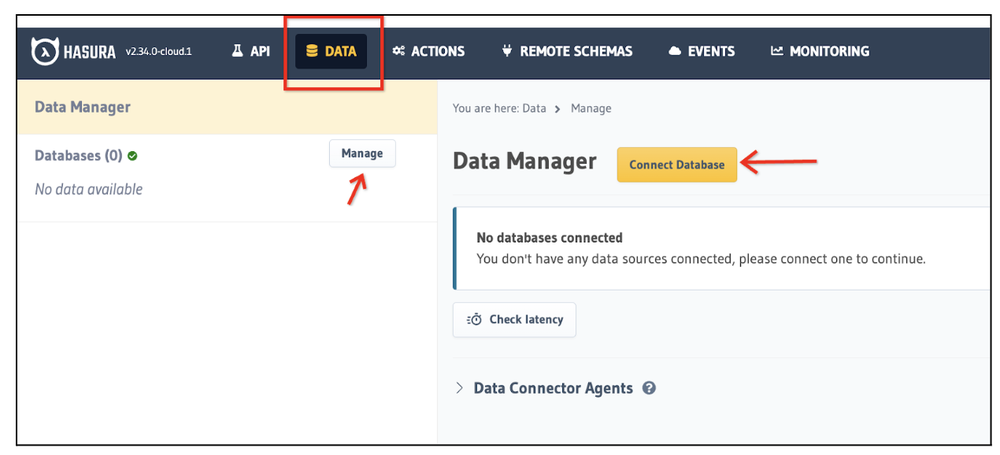
Hasura Data Source creation
From the list of options available, select BigQuery and then click on Connect Existing Database.
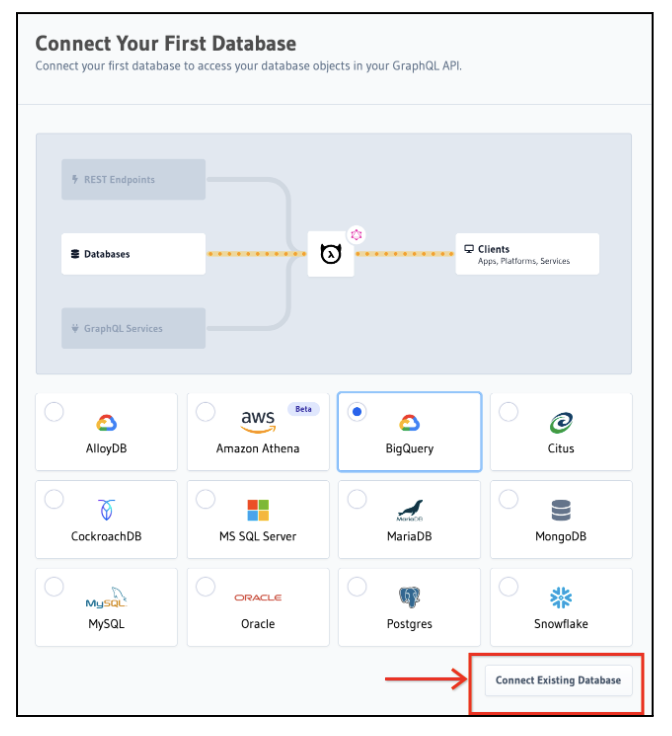
Hasura BigQuery Data Source creation
This will bring up a configuration screen (not shown here), where you will need to entire the service account, Google Project Id and BigQuery Dataset name.
Create an environment variable in the Hasura Settings that contains your Service Account Key (JSON file contents). A sample screenshot from my Hasura Project Settings is shown below. Note that the SERVICE_ACCOUNT_KEY variable below has the value of the JSON Key contents.
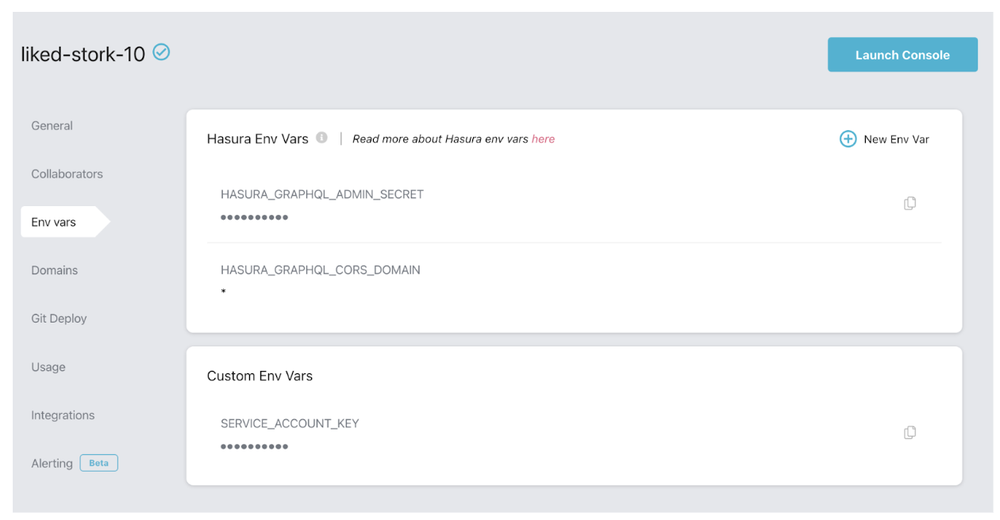
Hasura Project Settings
Coming back to the Database Connection configuration, you will see a screen as shown below. Fill out the Project Id and Dataset value accordingly.
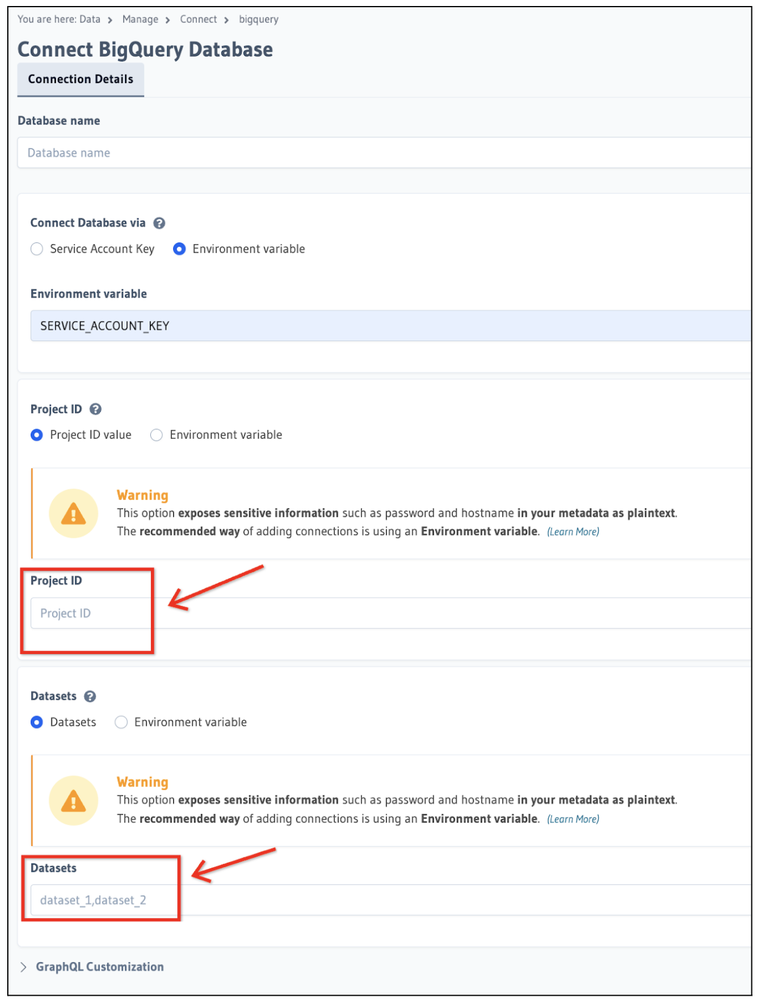
Hasura BigQuery Datasource configuration
Once the data connection is successfully set up, you can now mark which tables need to be tracked. Go to the Datasource settings and you will see that Hasura queried the metadata to find the tables in the dataset. You will see the tables listed as shown below:
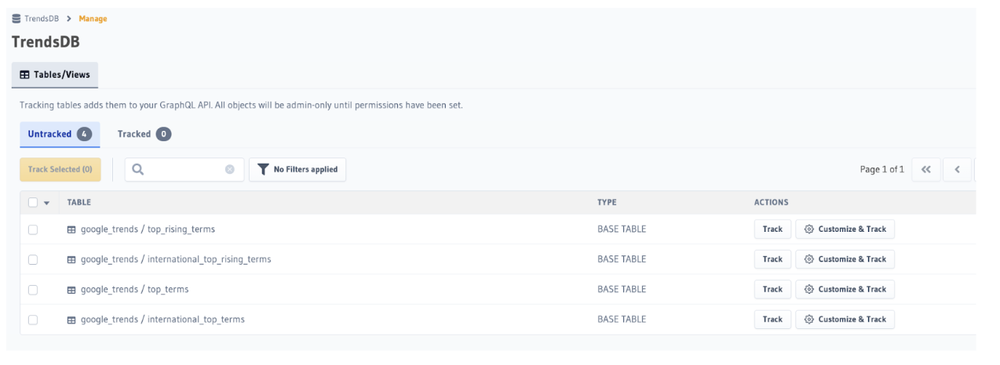
Hasura BigQuery Datasource tables
We select the table that we are interested in tracking i.e. select it and then click on the Track button.
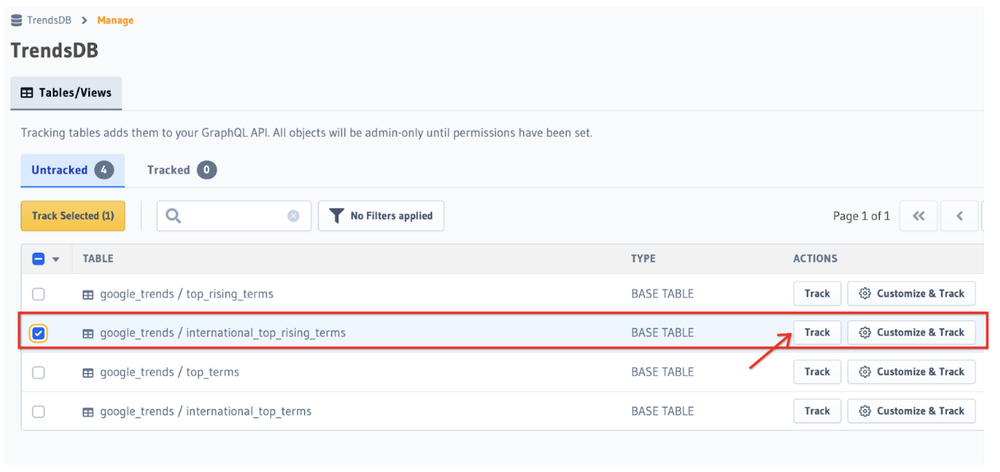
Hasura BigQuery Datasource table tracking
This will mark the table as tracked and we will now be able to go to the GraphQL Test UI to test out the queries.
The API tab provides us with a nice Explorer UI where you can build out the GraphQL query in an intuitive manner.
The query is shown below:
- code_block
- <ListValue: [StructValue([(‘code’, ‘query MyQuery {rn google_trends_international_top_rising_terms(where: {_and: {country_code: {_eq: “IN”}, refresh_date: {_eq: “2023-10-31″}}}, distinct_on: term) {rn termrn }rn}’), (‘language’, ”), (‘caption’, <wagtail.rich_text.RichText object at 0x3eb2283b1880>)])]>
The results in the editor as shown below:
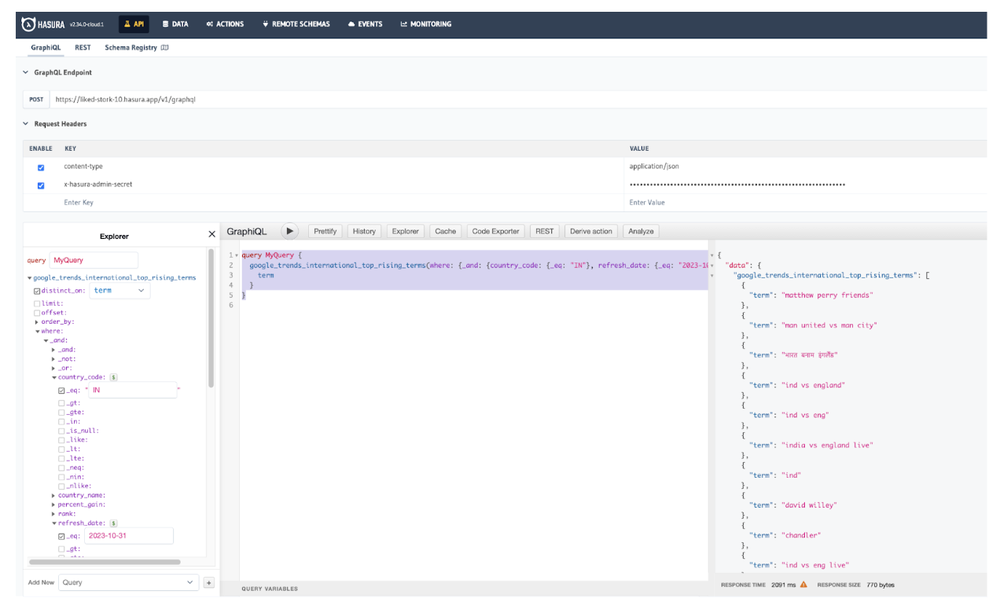
Hasura GraphiQL Tool
This was quite seamless and within minutes I could have a GraphQL layer ready for serving my applications.

