It may or may not have hit you yet, but brace yourself: It’s coming.
As we speak, Google’s in the midst of bringing its Gemini-powered generative-AI obsession into its most prominent and powerful product — and that’s search. Soon, anytime you search for something within Google, whether on your phone or on a computer and whether at the office or on the go, you’ll get AI-powered answers in place of the familiar blue links.
That’s all well and good in theory, but unless you like your search results to be unreliable and littered with shoddily sourced inaccuracies, it isn’t the most practical pivot. (And that’s to say nothing of the broader impact on publishers, content creators, and the very idea of an open web in general — a fascinatingly unsustainable paradox that doesn’t seem like it can possibly end well.)
You can see the new incoming setup for yourself in this demo video, and it should show up in your Google search results soon — like it or not:
Before you shed too many tears, though, take note: That may be the default search experience for most people moving forward — but you aren’t most people. You’re a smart and thoughtful Homo sapien who’s reading this column and capable of taking matters into your own hands.
[Psst: Love productivity hacks? My Android Shortcut Supercourse will teach you tons of easy efficiency-enhancers for your phone. Sign up now for free!]
And with about 60 seconds of effort, you can give yourself a simpler, smarter, and more efficient search setup that lets you find what you want from sources you trust without all the greasy AI gravy. It’s a return to a purer-seeming, more straightforward form of search — something closer to the web-wading prowess Google gave us originally, way back in its early days, before all the other stuff started creeping into the mix.
With the way things are shaping up around Gemini and other such large-language model AI systems right now, it may be the most important and impactful upgrade you make all year.
Ready?
Google’s Gemini-free web search option
So here’s the secret ingredient that makes this whole thing possible: Amidst all the AI hullabaloo coming out of Google’ grand I/O gala last week, the company quietly rolled out an out-of-sight feature that seems like the most significant search improvement of all.
It’s a new web-only mode for Google Search results that lets you eliminate all AI elements, knowledge panels, and also — for the moment, at least — ads from the page and focus only on the most relevant results from the web for your query. A novel concept, no?!
Google didn’t make any big announcements about the option, and you’d really have to know it’s there to find it. But it’s an incredible new resource to tap into, and with some super-simple setup, you can bring it up to the surface and make it readily available at your fingertips for hassle-free ongoing use.
The option is typically buried within the “More” menu that pops up alongside “Images,” “Videos,” and other such options at the top of Google Search results — right beneath the search box at the top of the screen. If you want to dig it up and try it out to see how it works, you can do so there without any commitment or lasting changes.
Here, meanwhile, is how to make that option your default search setup — no matter what kind of device you’re working on at any given moment:
The web-only Google search switch for Android
First, on the Android front, you curiously can’t set just anything to be your default search engine in most browsers right off the bat — so we’ve first gotta show your browser such a search setup in action and let it know that it exists.
Luckily, a crafty and generous web-warping internet citizen took it uponst themselves to create a page that makes this not only possible but also almost effortless to pull off:
- First, open this link within your favorite Android browser. (My instructions from here on out will be specific to Chrome, since that’s the de facto default Android web browser and what the vast majority of humans rely on, but most other Android browsers should offer similar — if occasionally slightly shifted around and reworded — options of their own.)
- Next, open up a new tab and search for anything at all. (I’d suggest “smiling salamanders,” but you do you.)
- Once you’ve done that, tap the three-dot menu icon in the browser’s upper-right corner and select “Settings” followed by “Search Engine.”
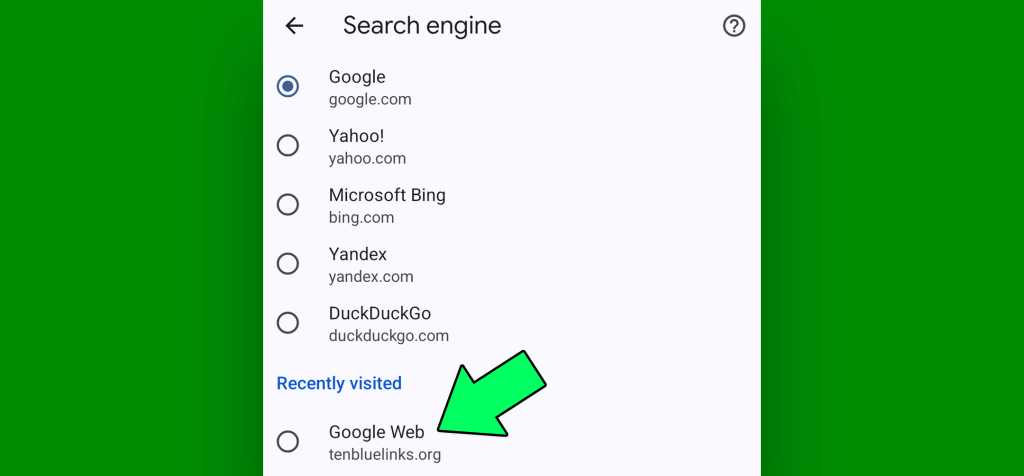
- Look for the newly added “Google Web” option beneath the “Recently visited” heading. Tap it to select it, then back your way out of that menu.

JR Raphael, IDG
And hey, how ’bout that? You’ve just given yourself direct access to web-only results by default for all of your browser-made searches. Just type whatever you want to find directly into the browser’s address bar, and you’ll be golden.

JR Raphael, IDG
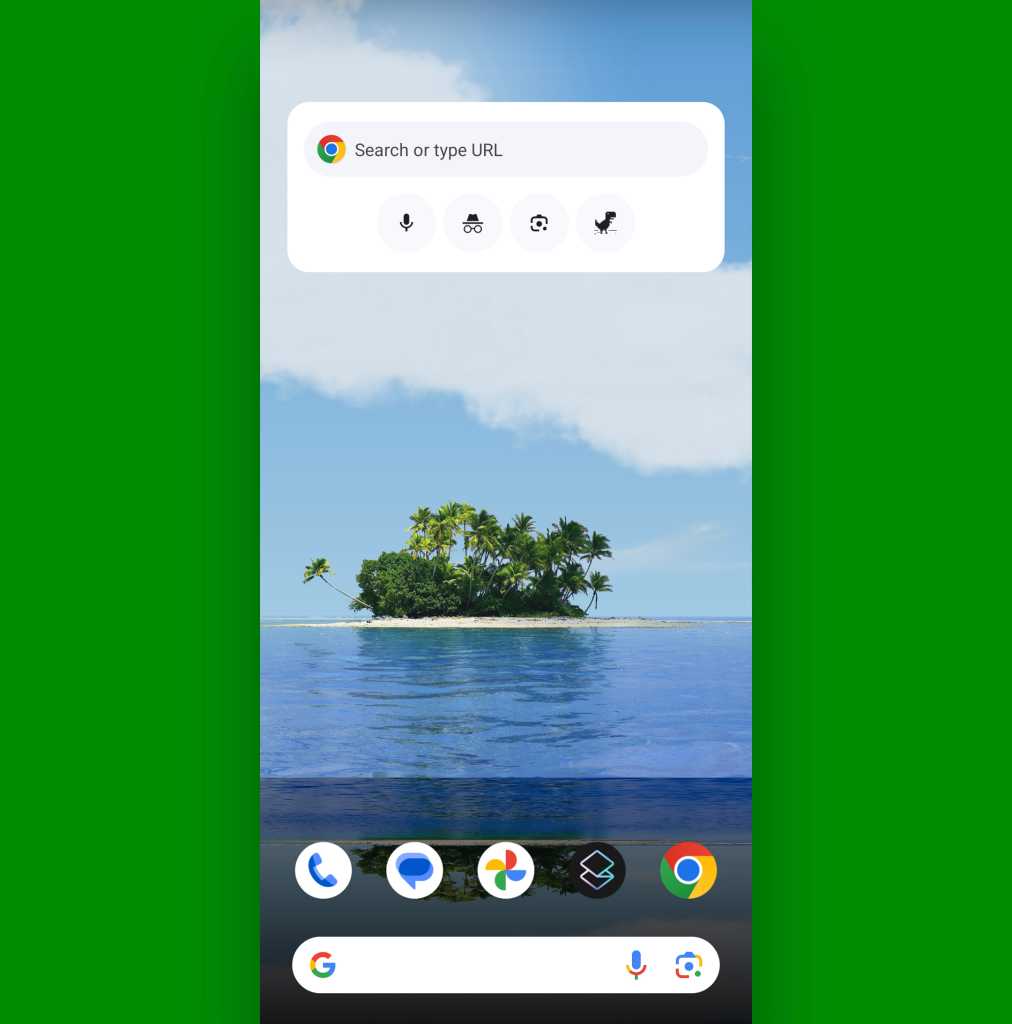
It’s worth noting that this change won’t affect searches started in other places — like within the Google Android app or any Google-associated search boxes on your home screen, for example. But you can always add a Chrome-specific search box (or a search box connected to any other browser you’re using) onto your home screen for even easier on-demand access:
- Press and hold a finger onto any blank space on your home screen and find the option to add a new widget.
- Scroll through the list of choices until you see “Chrome” (or, alternatively, another browser — if you’d rather).
- Tap that and look for the browser’s search widget. With Chrome, you can choose from either a traditional search bar or a series of icons that includes a browser-based search as well as a voice search, an incognito tab search, and even a visual search via Google Lens.
- Tap or press and hold the widget to finish adding it onto your home screen.

JR Raphael, IDG
Now, any of those options will take you directly into your browser with your newly refined web-only results for whatever you’re searching.
Not bad, right?! And it’s even easier to bring this newfound nugget of search sanity front and center within the desktop domain.
The web-only Google search switch for desktop computers
No matter what kind of computer you’re using — Windows, ChromeOS, Linux, even (gasp!) a Mac (if you must) — you can make Google’s new web-only search mode exceptionally accessible in your desktop browser via a custom Chrome address bar action.
The same sort of thing is possible in most other browsers, too, so if you aren’t using Chrome, poke around a bit — and you should find a similar equivalent.
Basically, the idea — as first surfaced by Tedium’s Ernie Smith — is that you create your own custom search engine within Chrome’s settings, using a specially formatted URL that leads you to the Google web-only search setup. You can then either summon that command by typing a series of letters into the browser’s address bar or you can go a step further and set it as the default search engine for all of your browser-based searching escapades.
Either way, it takes surprisingly little legwork to accomplish:
- First, type chrome:settings into Chrome’s address bar to pull up the browser’s settings.
- Click “Search engine” in the main left-of-screen menu, then click “Manage search engines and site search.”
- See the section in the screen’s main area called “Site search”? Click the Add button alongside it.
- Now, in the box that comes up…
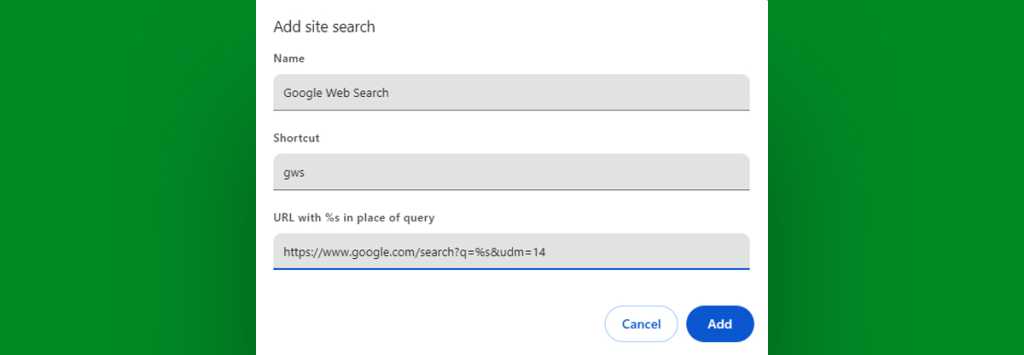
- Type Google Web Search into the “Name” field.
- Type gws into the “Shortcut” field.
- And in the “URL” field, paste in the following string of text:
https://www.google.com/search?q=%s&udm=14

JR Raphael, IDG
Now, click the Add button — and think about how you’d like this to work.
- If you’d like to keep the standard (soon-to-be AI-powered) Google Search approach as your default, just remember the shortcut gws. You can now type those three letters into your browser’s address bar and then hit the Tab key anytime to initiate a web-only search without all the other elements.
- If you’d like to make the web-only search your browser-wide default — so that any terms you type into the address bar automatically get sent into that web-only results format…
- Find your newly created shortcut within the same “Site search” section of the Chrome settings that we were just looking at. (You might have to click an “Additional sites” link at the bottom of that section to see it.)
- Click the three-dot menu icon to the right of the shortcut’s line.
- And click “Make default” in the menu that pops up.

JR Raphael, IDG
All that’s left is to pat yourself on the back and get yourself a cookie and/or cobbler: You’ve successfully eliminated Gemini’s inconsistently inaccurate answers from your search results and injected a whole slew of extra sanity into your information-finding workflow.
Now, that’s what I call progress.
Treat yourself to a smorgasbord of smart shortcut knowledge with my free Android Shortcut Supercourse. You’ll learn tons of time-saving tricks for your phone!

