YugabyteDB, a distributed SQL database, when combined with BigQuery, tackles data fragmentation, data integration, and scalability issues businesses face.
It ensures that data is well-organized and not scattered across different places, making it easier to use in BigQuery for analytics. YugabyteDB’s ability to grow with the amount of data helps companies handle more information without slowing down. It also maintains consistency in data access, crucial for reliable results in BigQuery’s complex queries. The streamlined integration enhances overall efficiency by managing and analyzing data from a single source, reducing complexity. This combination empowers organizations to make better decisions based on up-to-date and accurate information, contributing to their success in the data-driven landscape.
BigQuery is renowned for its ability to store, process, and analyze vast datasets using SQL-like queries. As a fully managed service with seamless integration into other Google Cloud Platform services, BigQuery lets users scale their data operations to petabytes. It also provides advanced analytics, real-time dashboards, and machine learning capabilities. By incorporating YugabyteDB into the mix, users can further enhance their analytical capabilities and streamline their data pipeline.
YugabyteDB is designed to deliver scale, availability and enterprise-grade RDBMS capabilities for mission-critical transactional applications. It is a powerful cloud-native database that thrives in any cloud environment. With its support for multi-cloud and hybrid cloud deployment, YugabyteDB seamlessly integrates with BigQuery using the YugabyteDB CDC Connector and Apache Kafka. This integration enables the real-time consumption of data for analysis without the need for additional processing or batch programs.
Benefits of BigQuery integration with YugabyteDB
Integrating YugabyteDB with BigQuery offers numerous benefits. Here are the top six.
- Real-time data integration: YugabyteDB’s Change Data Capture (CDC) feature synchronizes data changes in real-time between YugabyteDB and BigQuery tables. This seamless flow of data enables real-time analytics, ensuring that users have access to the most up-to-date information for timely insights.
- Data accuracy: YugabyteDB’s CDC connector ensures accurate and up-to-date data in BigQuery. By capturing and replicating data changes in real-time, the integration guarantees that decision-makers have reliable information at their disposal, enabling confident and informed choices.
- Scalability: Both YugabyteDB and BigQuery are horizontally scalable solutions capable of handling the growing demands of businesses. As data volumes increase, these platforms can seamlessly accommodate bigger workloads, ensuring efficient data processing and analysis.
- Predictive analytics: By combining YugabyteDB’s transactional data with the analytical capabilities of BigQuery, businesses can unlock the potential of predictive analytics. Applications can forecast trends, predict future performance, and proactively address issues before they occur, gaining a competitive edge in the market.
- Multi-cloud and hybrid cloud deployment: YugabyteDB’s support for multi-cloud and hybrid cloud deployments adds flexibility to the data ecosystem. This allows businesses to retrieve data from various environments and combine it with BigQuery, creating a unified and comprehensive view of their data.
By harnessing the benefits of YugabyteDB and BigQuery integration, businesses can supercharge their analytical capabilities, streamline their data pipelines, and gain actionable insights from their large datasets. Whether you’re looking to make data-driven decisions, perform real-time analytics, or leverage predictive analytics, combining YugabyteDB and BigQuery is a winning combination for your data operations.
Key use cases for YugabyteDB and BigQuery integration
YugabyteDB’s Change Data Capture (CDC) with BigQuery serves multiple essential use cases. Let’s focus on two key examples.
1.Industrial IoT (IIoT): In IIoT, streaming analytics is the continuous analysis of data records as they are generated. Unlike traditional batch processing, which involves collecting and analyzing data at regular intervals, streaming analytics enables real-time analysis of data from sources like sensors/actuators, IoT devices and IoT gateways. This data can then be written into YugabyteDB with high throughput and then streamed continuously to BigQuery Tables for advanced analytics using Google Vertex AI or other AI programs.
Examples of IIoT Stream Analytics
BigQuery can process and analyze data from industrial IoT devices, enabling efficient operations and maintenance. Two real-world examples include:
- Supply chain optimization: Analyze data from IoT-enabled tracking devices to monitor inventory, track shipments, and optimize logistics operations.
- Energy efficiency: Analyze data from IoT sensors and meters to identify energy consumption patterns to optimize usage and reduce costs.
2. Equipment predictive maintenance analytics: In various industries such as manufacturing, telecom, and instrumentation, equipment predictive maintenance analytics is a common and important use case. YugabyteDB plays a crucial role in collecting and storing equipment notifications and performance data in real time. This enables the seamless generation of operational reports for on-site operators, providing them with current work orders and notifications.
Maintenance analytics is important for determining equipment lifespan and identifying maintenance requirements. YugabyteDB CDC facilitates the integration of analytics data residing in BigQuery. By pushing the stream of notifications and work orders to BigQuery tables, historical data accumulates, enabling the development of machine learning or AI models. These models can be fed back to YugabyteDB for tracking purposes, including failure probabilities, risk ratings, equipment health scores, and forecasted inventory levels for parts. This integration not only enables advanced analytics but also helps the OLTP database (in this case, YugabyteDB) store the right data for the site engineers or maintenance personnel in the field.
So now let’s walk through how easy it is to integrate YugabyteDB with BigQuery using CDC.
Integration architecture of YugabyteDB to BigQuery
The diagram below (Figure 1) shows the end-to-end integration architecture of YugabyteDB to BigQuery.

Figure 1 – End to End Architecture
The table below shows the data flow sequences with their operations and tasks performed.
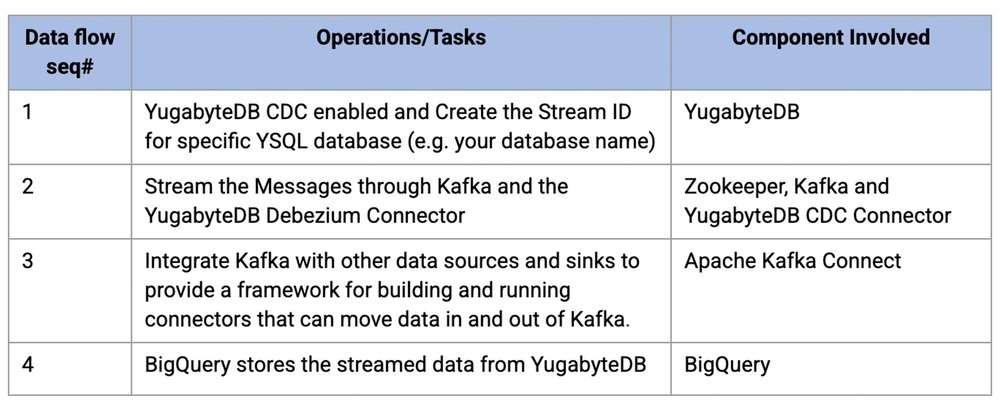
Note: Link for creating the stream ID mentioned in #1
1. Set up BigQuery Sink
Install YugabyteDB
You can deploy YugabyteDB available on Google Cloud Marketplace using this link. Alternatively, there are other options to install or deploy YugabyteDB. If you are running in Windows, you can leverage Docker on Windows with YugabyteDB.
Install and set up YugabyteDB CDC and Debezium connector
Ensure YugabyteDB CDC is configured to capture changes in the database and is running (as per the above architecture diagram) along with its dependent components. You should see a Kafka topic name and group name as per this document; it will appear in the streaming logs either through CLI or via Kafka UI (e.g. if you used KOwl).
Download and configure BigQuery Connector
Download the BigQuery Connector . Unzip and add the JAR files to YugabyteDB’s CDC (Debezium Connector) Libs folder (e.g. /kafka/libs). Then restart the Docker container
Set up BigQuery in Google Cloud
Setting up BigQuery in Google Cloud benefits both developers and DBAs by providing a scalable, serverless, and integrated analytics platform. It simplifies data analytics processes, enhances collaboration, ensures security and compliance, and supports real-time processing, ultimately contributing to more effective and efficient data-driven decision-making.
Follow these five steps to set up BigQuery in Google Cloud.
- Create a Google Cloud Platform account. If you don’t already have one, create a Google Cloud Platform account by visiting the Google Cloud Console and following the prompts.
- Create a new project (if you don’t already have one). Once you’re logged into the Google Cloud Console, create a new project by clicking the “Select a Project” dropdown menu at the top of the page and clicking on “New Project”. Follow the prompts to set up your new project.
- Enable billing (if you haven’t done it already). NOTE: Before you can use BigQuery, you need to enable billing for your Google Cloud account. To do this, navigate to the “Billing” section of the Google Cloud Console and follow the prompts.
- Enable the BigQuery API: To use BigQuery, you need to enable the BigQuery API for your project. To do this, navigate to the “APIs & Services” section of the Google Cloud Console and click on “Enable APIs and Services”. Search for “BigQuery” and click the “Enable” button..
- Create a Service Account and assign BigQuery roles in IAM (Identity and Access Management): As shown in Figure 4, create a service account and assign the IAM role for Big Query. The following roles are mandatory to create a BigQuery table:
- BigQuery Data Editor
- BigQuery Data Owner
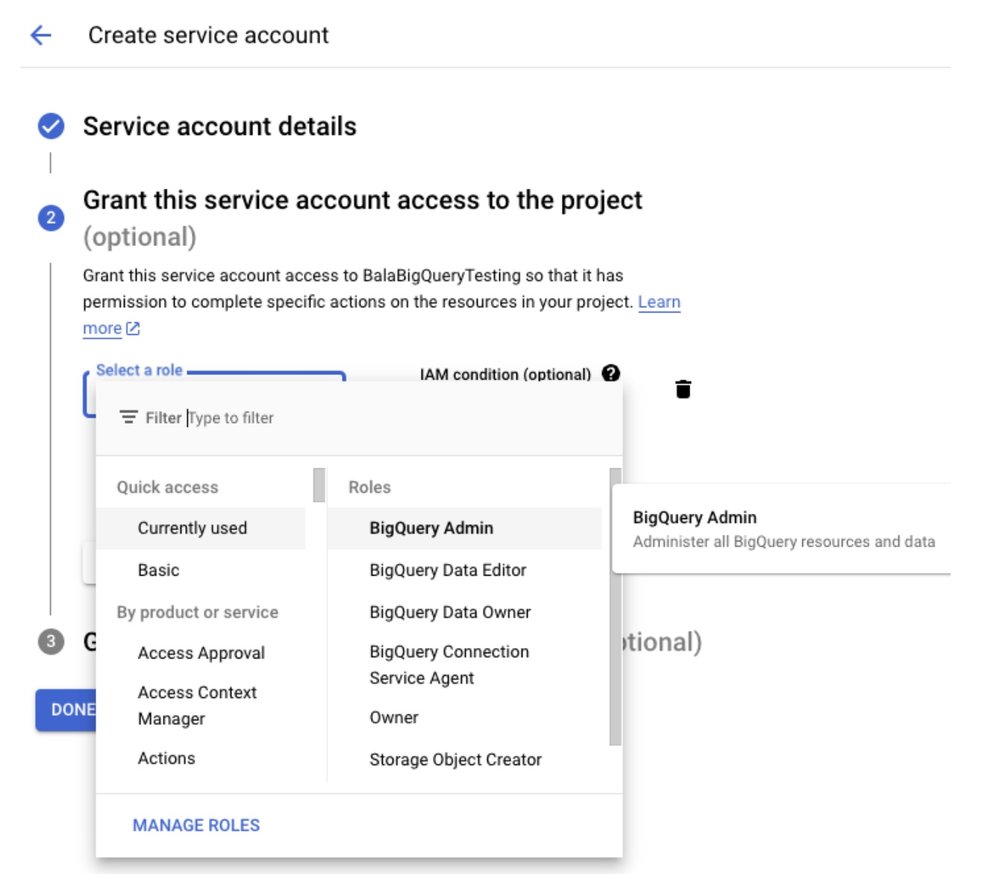
Figure 2 – Google Cloud – Service Account for BigQuery
After creating a service account, you will see the details (as shown in Figure 3). Create a private and public key for the service account and download it in your local machine. It needs to be copied to YugabyteDB’s CDC Debezium Docker container in a designated folder (e.g., “/kafka/balabigquerytesting-cc6cbd51077d.json”). This is what you refer to while deploying the connector.
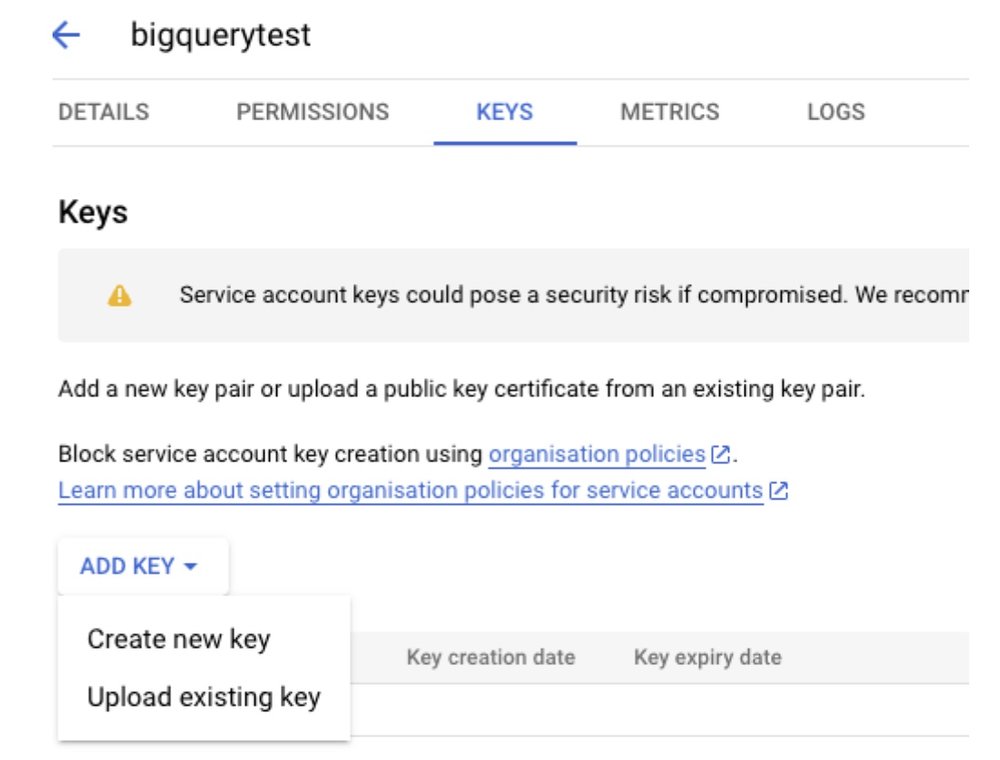
Figure 3 – Google Cloud – Generate Key for the Service Account
2. Deploy the configuration for the BigQuery connector
Source Connector
Create and deploy the source connector (as shown below), change the database hostname, database master addresses, database user, password, database name, logical server name and table include list and StreamID according to your CDC configuration (refer code block highlighted in yellow).
- code_block
- <ListValue: [StructValue([(‘code’, ‘curl -i -X POST -H “Accept:application/json” -H “Content-Type:application/json” localhost:8083/connectors/ -d ‘{rn “name”: “srcdb”,rn “config”: {rn “connector.class”: “io.debezium.connector.yugabytedb.YugabyteDBConnector”,rn “database.hostname”:”10.9.205.161″,rn “database.port”:”5433″,rn “database.master.addresses”: “10.9.205.161:7100”,rn “database.user”: “yugabyte”,rn “database.password”: “xxxx”,rn “database.dbname” : “yugabyte”,rn “database.server.name”: “dbeserver5”,rn “table.include.list”:”public.testcdc”,rn “database.streamid”:”d36ef18084ed4ad3989dfbb193dd2546″,rn “snapshot.mode”:”initial”,rn “transforms”: “unwrap”, rn “transforms.unwrap.type”: “io.debezium.connector.yugabytedb.transforms.YBExtractNewRecordState”, rn “transforms.unwrap.drop.tombstones”: “false”,rn “time.precision.mode”: “connect”,rn “key.converter”:”io.confluent.connect.avro.AvroConverter”,rn “key.converter.schema.registry.url”:”http://localhost:18081″,rn “key.converter.enhanced.avro.schema.support”:”true”,rn “value.converter”:”io.confluent.connect.avro.AvroConverter”,rn “value.converter.schema.registry.url”:”http://localhost:18081″,rn “value.converter.enhanced.avro.schema.support”:”true”rn rn }rn }”), (‘language’, ”), (‘caption’, <wagtail.rich_text.RichText object at 0x3e71ef9ad580>)])]>
Target Connector (BigQuery Connector):
The configuration below shows a sample BigQuerySink connector. The topic name, Google project, dataset name, default dataset name — highlighted in yellow — need to be replaced according to your specific configuration.
The key file fields contain the private key location of your Google project, and it needs to be kept in the YugabyteDB’s CDC Debezium Docker connector folder. (e.g. /kafka)
- code_block
- <ListValue: [StructValue([(‘code’, ‘curl -i -X POST -H “Accept:application/json” -H “Content-Type:application/json” localhost:8083/connectors/ -d ‘{rn “name”: “bigquerysinktests”,rn “config”: {rn “connector.class”: “com.wepay.kafka.connect.bigquery.BigQuerySinkConnector”,rn “tasks.max” : “1”,rn “topics” : “dbserver11.public.testcdc”,rn “sanitizeTopics” : “true”,rn “autoCreateTables” : “true”,rn “allowNewBigQueryFields” : “true”,rn “allowBigQueryRequiredFieldRelaxation” : “true”,rn “schemaRetriever” : “com.wepay.kafka.connect.bigquery.retrieve.IdentitySchemaRetriever”,rn “project”:”balabigquerytesting”,rn “datasets”:”.*=testcdc”,rn “defaultDataset” : “testcdc”,rn “keyfile” : “/kafka/balabigquerytesting-cc6cbd51077d.json”rn }rn}”), (‘language’, ”), (‘caption’, <wagtail.rich_text.RichText object at 0x3e71ef9adee0>)])]>
3. Output in BigQuery Console
After deployment, the table name (e.g. dbserver11_public_testcdc) will be created in BigQuery automatically (see below).
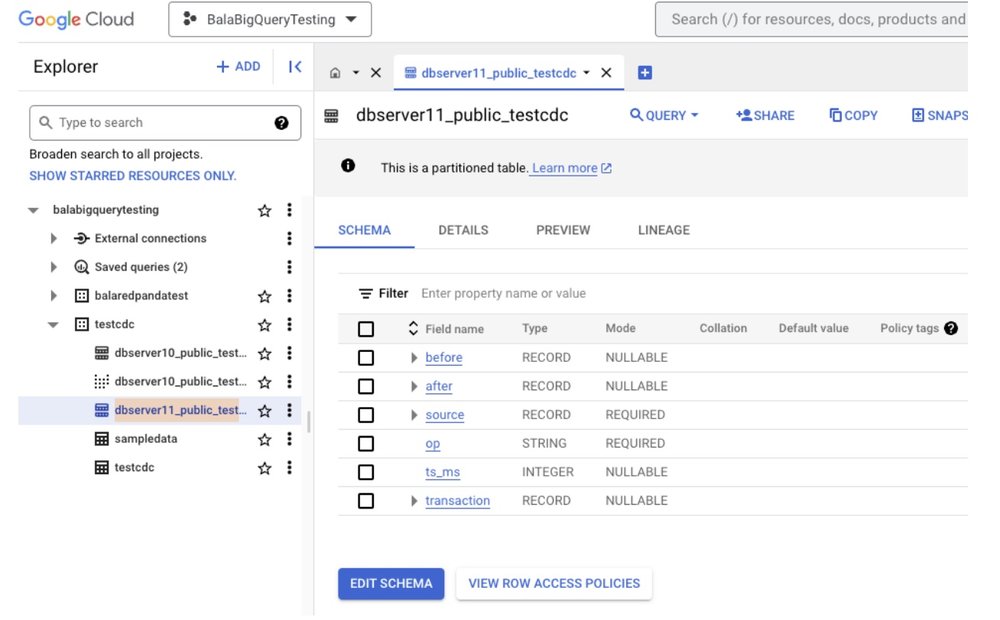
Figure 4 – Data stored in the BigQuery Table

Figure 5 – BigQuery – Execution Details for a sample BigQuery table is shown below.
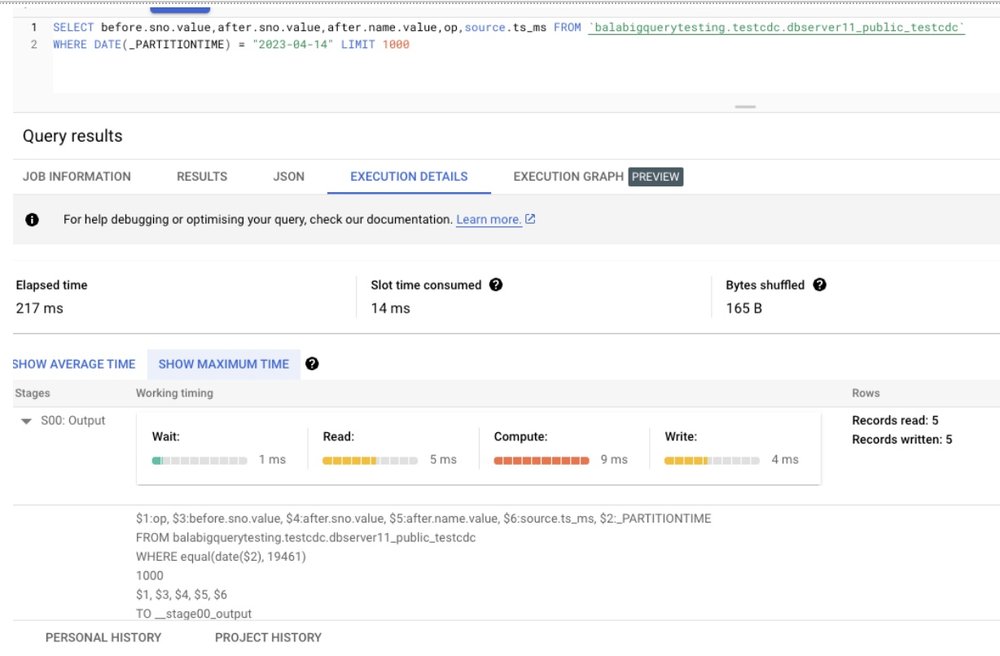
Figure 6 – Query Execution Details
Conclusion and summary
Following the steps above is all it takes to integrate YugabyteDB’s CDC connector with BigQuery.
Combining YugabyteDB OLTP data with BigQuery data can benefit an application in a number of ways (e.g. real-time analytics, advanced analytics with machine learning, historical analysis and data warehousing and reporting). YugabyteDB holds the transactional data that is generated by an application in real-time, while BigQuery data is typically large, historical data sets that are most often used for analysis. By combining these two types of data, an application can leverage the strengths of both to provide real-time insights and support better, quicker, more accurate and informed decision-making.
Next steps:
- Discover more about YugabyteDB
- Dive into distributed SQL with Distributed SQL for Dummies
- Ready to give it a try? Procure YugabyteDB through Google Cloud Marketplace, and build your first geo-distributed application.

