
Remove temporary data from your iPhone to fix loading issues or connection errors.
Deleting stored files frees up space and strengthens browsing privacy. Follow these steps to clear your browser’s cache on an iPhone.
Quick Steps:
- Open the Settings menu.
- Go to the browser settings section.
- Select the option to clear browsing history and website data.
- Choose the option to delete all history.
- Confirm by clearing the history.
Safari
Open the Settings on your device.
Find the grey icon with gears, usually on the Home screen. If it’s missing, check the App Library.
Clearing Safari’s cache, cookies, and browsing history will occur during this process. To keep your history, skip to the final step.
Scroll down and select the web browser.
Find the icon shaped like a compass, positioned about a third down the screen.
Choose the option to erase browsing records and site information.
Scroll down to find it; it sits around the middle section of the screen. A menu will pop up.
Select the “Complete history” option.
The system lists this choice at the bottom of the “Clear Duration” section.
Proceeding will remove browsing data across all devices linked to the same user account. It will not affect your stored credentials, contact details, or payment methods.
Click Clear History to confirm.
I have cleared your browsing history and cached data.
Precise stored data while keeping browsing records (optional).
To clear data and cookies without removing your browsing records, follow these actions:
- Open your device’s settings.
- Choose your browser settings.
- Access advanced options.
- Tap on website data.
- Select to remove all stored data.
Google Chrome
Open the web browser.
It has a light-colored icon with a multi-colored circle inside.
- When you sign in to the browser with the same account as on your mobile device, any browsing information you remove will also disappear from that device.
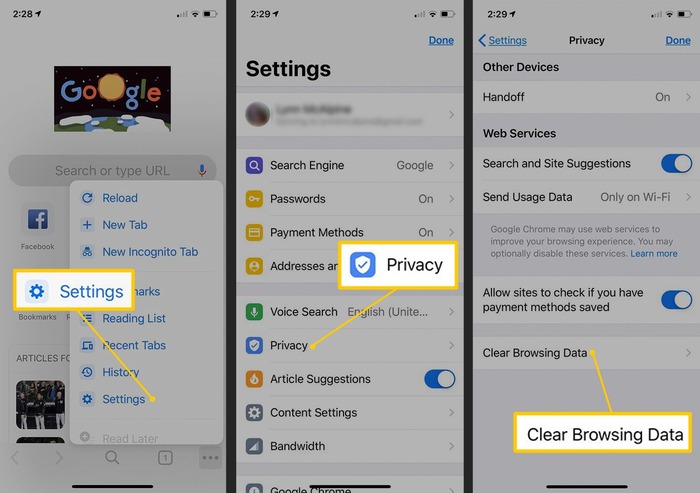
Select the menu.
It’s the three symbols positioned at the lower-right section of the display. Selecting them reveals a list of options.
Choose the option for past actions.
It appears at the top of the menu. If it’s not displayed, swipe to the side of the applications to uncover additional options.
Tap “Erase Data”
Locate this option as a highlighted link at the lower-left corner of your activity log.
Choose the data you wish to erase.
By default, the system pre-selects the first three options (History, Stored Information, and Cached Files).
An icon next to each option indicates its scheduled removal. To remove a different data type, select it, and the icon will appear.
If you only wish to clear temporary files, deselect the other choices by tapping the symbol next to them.
Be careful not to include “Stored Credentials” or “Form Information” to prevent removing saved login details, addresses, or payment information.
Choose the option to remove stored data at the bottom.
A verification message will appear.
Click Clear Browsing Data again to confirm.
The system removes the selected data.
Firefox
Launch the Firefox application.
It features an orange fox wrapping around a purple globe.
Tap the menu icon
Located in the bottom-right corner of the screen.
Choose the configuration option.
It appears at the lower part of the list.
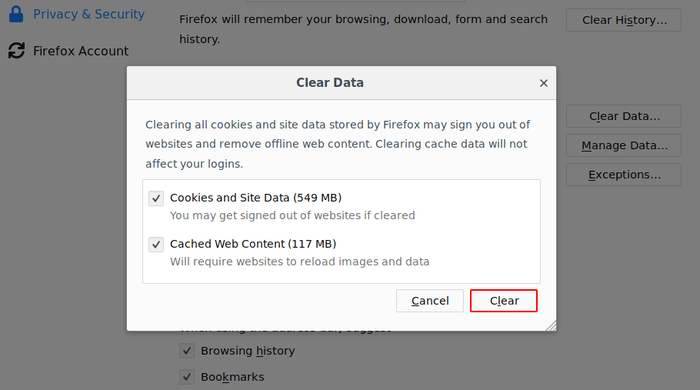
Select Data Management
Located under the Privacy section.
Choose the information to remove.
Set the associated toggle to the active position to select a data category for removal.
By default, all toggles remain active except for one specific category. To remove only the temporary files, deactivate all other selected categories.
Choose the option to remove personal data.
Look for the highlighted element at the bottom of the screen. A notification will alert you that the action has no reversal.
Once you access the platform with your account, remove the saved data to delete it from all devices linked to the same account.
Click “OK” to confirm.
It will remove all the selected data.
Microsoft Edge
Open the web browsing application.
It displays an icon in white with a wave design in blue and green inside.
Click the menu icon
It appears in the lower-right section of the display.
Open the records.
It appears at the top of the displayed options.
Select the bin icon.
It sits in the upper-right corner, next to the Done option.
Choose what kind of stored information you want to erase.
Typically, the first few categories—like activity records, temporary site data, and saved visuals—appear selected, each showing a colored indicator.
To include more categories, tap the one you want so it’s marked for removal.
- To clear only saved visuals, tap the others to remove their selection.
- Avoid selecting stored access details or form suggestions, as that will erase saved login info, personal entries, and payment records.
Press the clear option.
It is located at the bottom, marked in a noticeable color.
When you log in using a personal profile, removing stored data erases it from all connected devices where the same profile is active.
Select Clear now.
Delete the chosen data from the browser.