We are excited to announce the general availability of Guided Deployment Automation for SAP on Google Cloud. This new service within Workload Manager helps accelerate deployment of SAP workloads on Google Cloud by allowing customers to specify what they are trying to deploy, and then incorporating opinionated guidance, best practices, and deployment automation directly into the console.
For customers who choose to deploy SAP S/4HANA on Google Cloud, this service provides several key benefits:
-
Efficiency: End-to-end automation simplifies the lengthy and error-prone deployment process and automates infrastructure provisioning, operating system configuration, high availability cluster setup, and installation of the chosen application
-
Reliability: Built-in checks and safeguards help ensure you are automatically following best-practices and the latest architecture guidance from both SAP and Google Cloud, without having to manually read through pages and pages of documentation
-
Flexibility: Choose to deploy in “one click” directly from the console, or generate and download the equivalent Terraform and Ansible to add to an existing deployment pipelines or customize further
There is no charge to use this deployment service, but customers pay for any of the underlying resources or other services created and used in the deployment, such as VM Instances and disks.
How does it work?
After picking from the list of supported SAP products and versions, the guided interface helps you customize and configure your workload, while the equivalent infrastructure as code (Terraform, Ansible) is generated based on your selections.When deploying directly from the console, a Cloud Build job is created to execute the Terraform and provision the required resources in your project. The exact resources created will vary depending upon your configuration, but the following diagram shows a high-level architecture for a Distributed High Availability deployment. The documentation contains additional information on the resources created during the deployment.
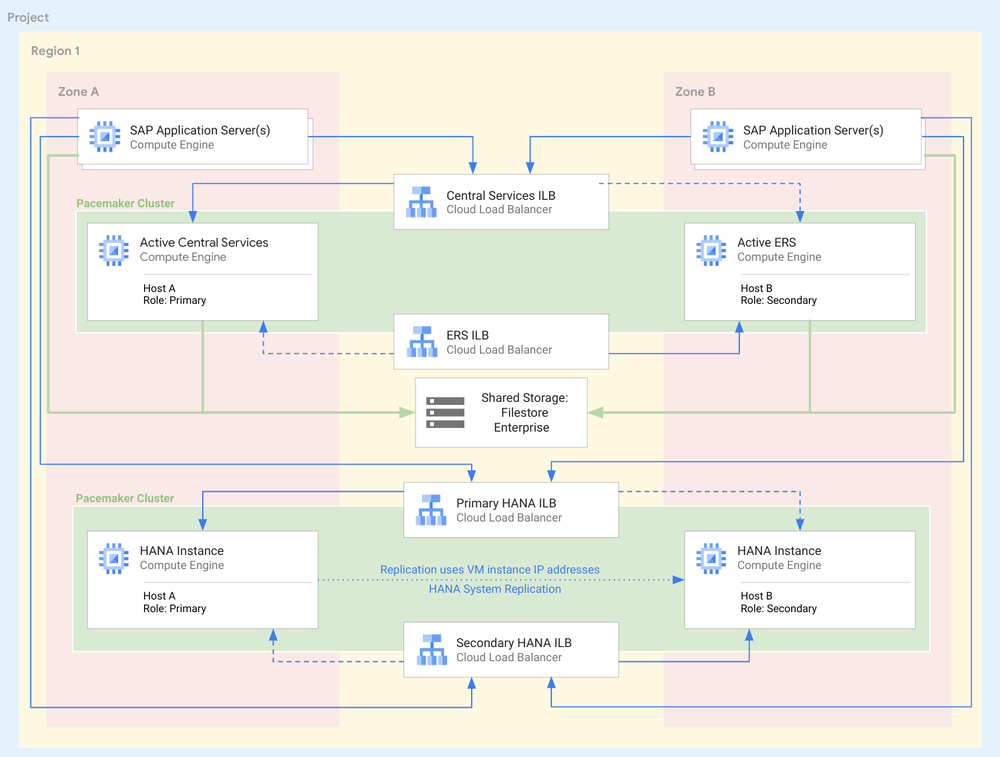
High-Level architecture for a Distributed High Availability deployment
In addition to the resources required for your SAP workload, a temporary VM instance is also deployed to handle the orchestration and execution of Ansible. Ansible is used to complete the remainder of the deployment process and performs tasks and operations such as the following:
-
Operating system configuration
-
Installation of HANA and initial backup
-
Configuration of OS Clusters
-
Enablement of HANA System Replication (HSR)
-
Installation of S/4HANA
-
Execution of initial database load
-
Installation of required agents (SAP Host Agent, Google Cloud’s Agent for SAP)
Getting started – Deploy a SAP S/4HANA workload
Before beginning, ensure that you have completed the prerequisites to use the deployment service within Workload Manager. There are a few additional prerequisites for deploying SAP workloads, such as uploading the required SAP installation files to Cloud Storage.
Afterwards, navigate to Workload Manager > Deployment in the console, which is nested under Compute in the left navigation pane or can be found in the search bar at the top. Click the Create SAP Deployment button at the top to begin.
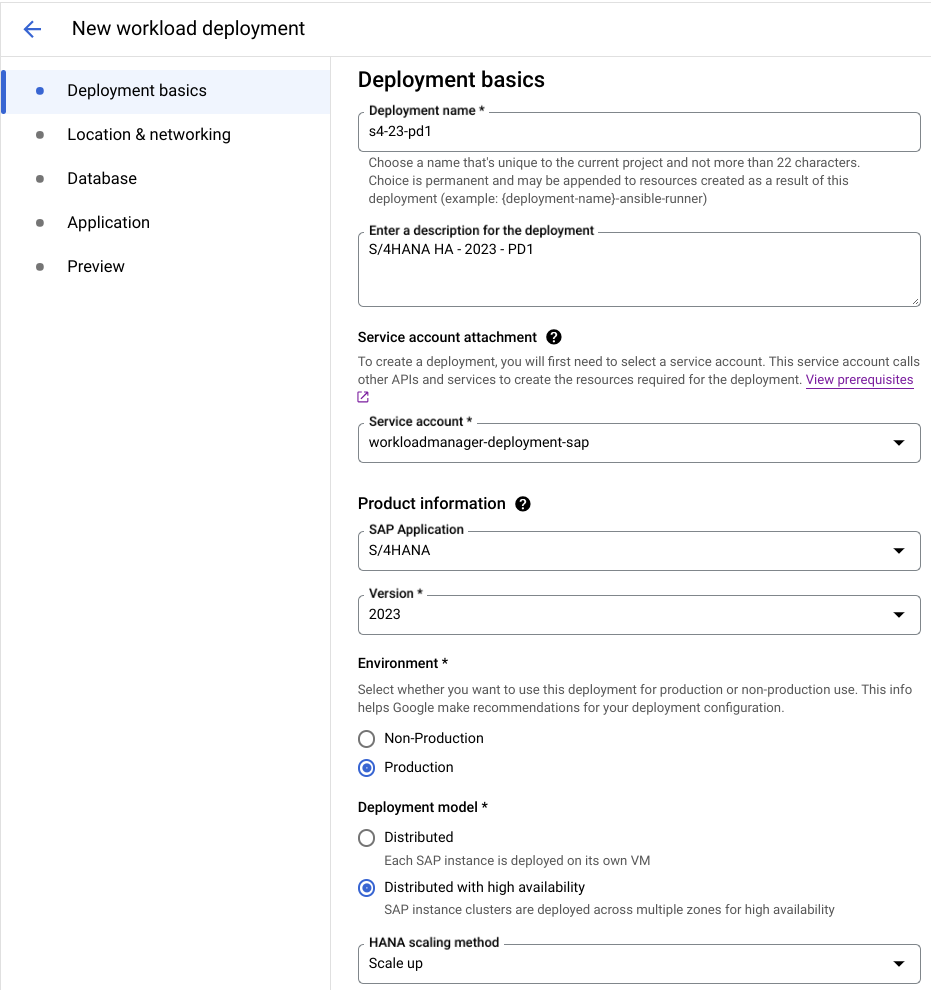
Deployment Basics Tab:
The first tab collects basic information for the deployment and allows you to pick from the supported applications and architectures. The selections on this page help determine which information shows on the following tabs, and also will pre-populate some of the subsequent inputs.
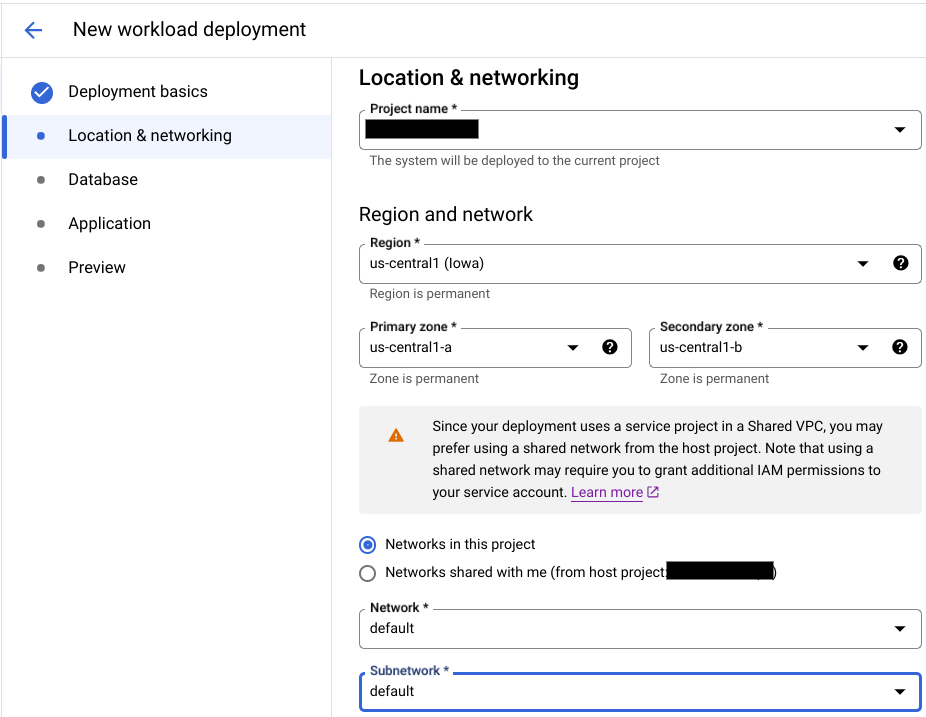
Location & Networking Tab:
On this tab, specify where the system should be deployed, which includes the region and zone(s) and the network to use. If you have a Shared VPC configured, you can also choose to select the network from the Host Project.
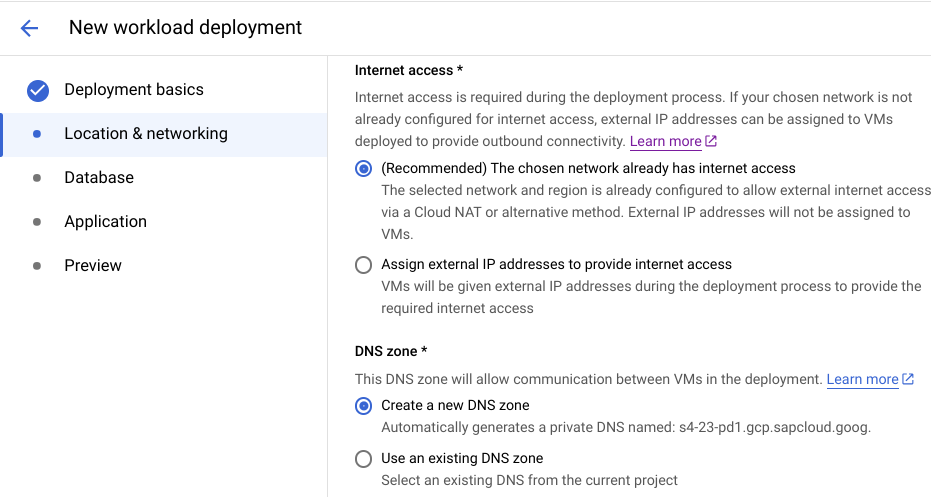
External internet access is required during the deployment process, and you can choose to create external IP addresses if the chosen network does not already have access. Finally, you can specify whether a new DNS should automatically be created, or if you wish to select an existing one.
Database Tab:
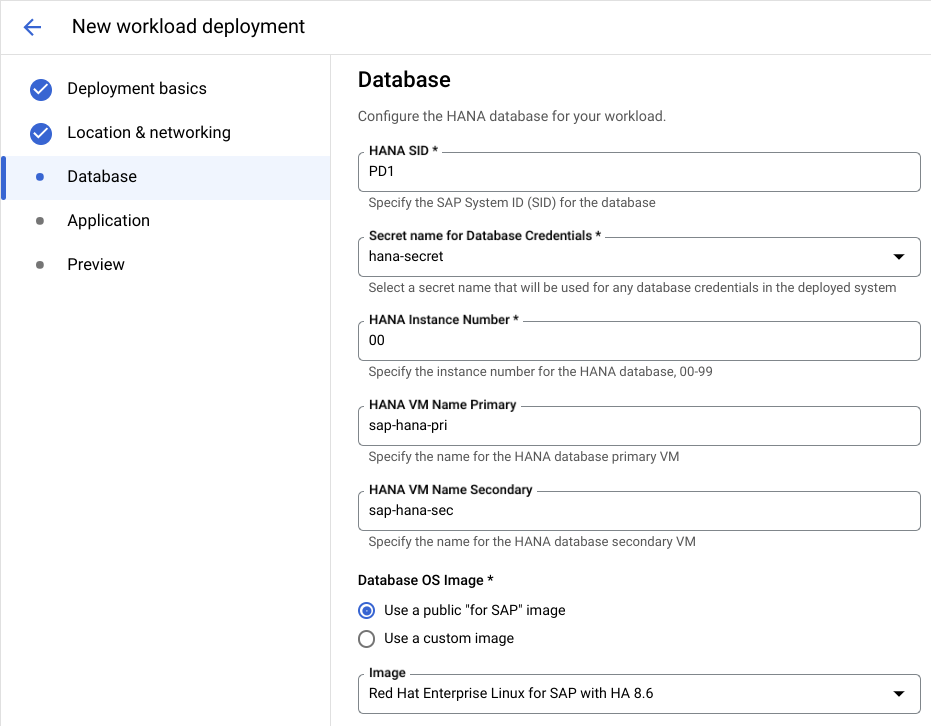
Next you will begin configuring the HANA database layer, where you can enter the HANA SID and customize the instance number and VM names. Secret Manager is fully integrated to securely store any credentials used during the deployment process. You can select from a list of certified public operating systems, or choose your own Custom Image.
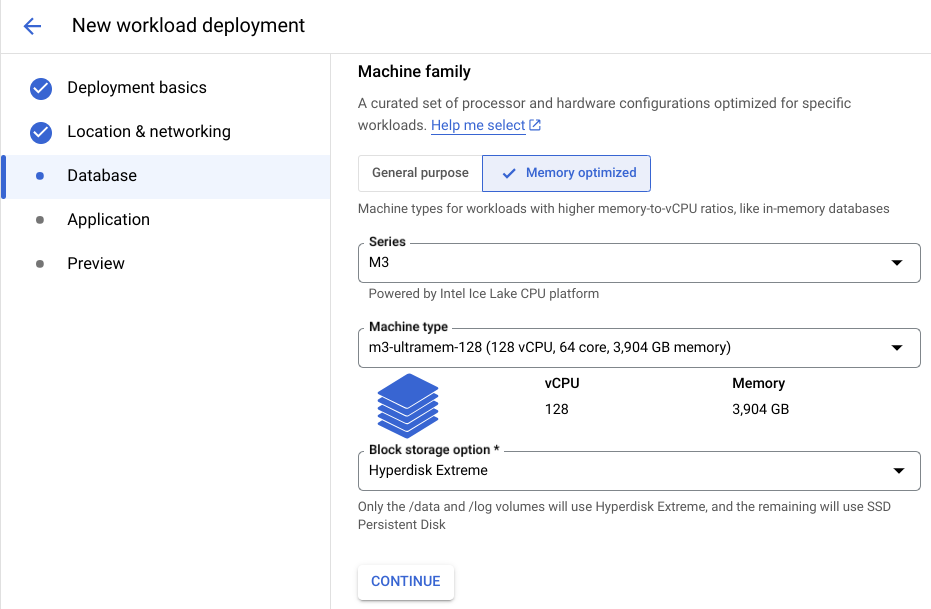
Afterwards, pick from the list of certified HANA machine shapes and choose your desired storage type. Disk volumes and sizes are automatically calculated based on the best practices for your chosen size.
Application Tab:
On the Application tab, you will repeat a similar process and enter information on the central services and application layer. You can make selections independently for each, for example, picking different machine sizes or operating systems for the ASCS compared to the application servers.
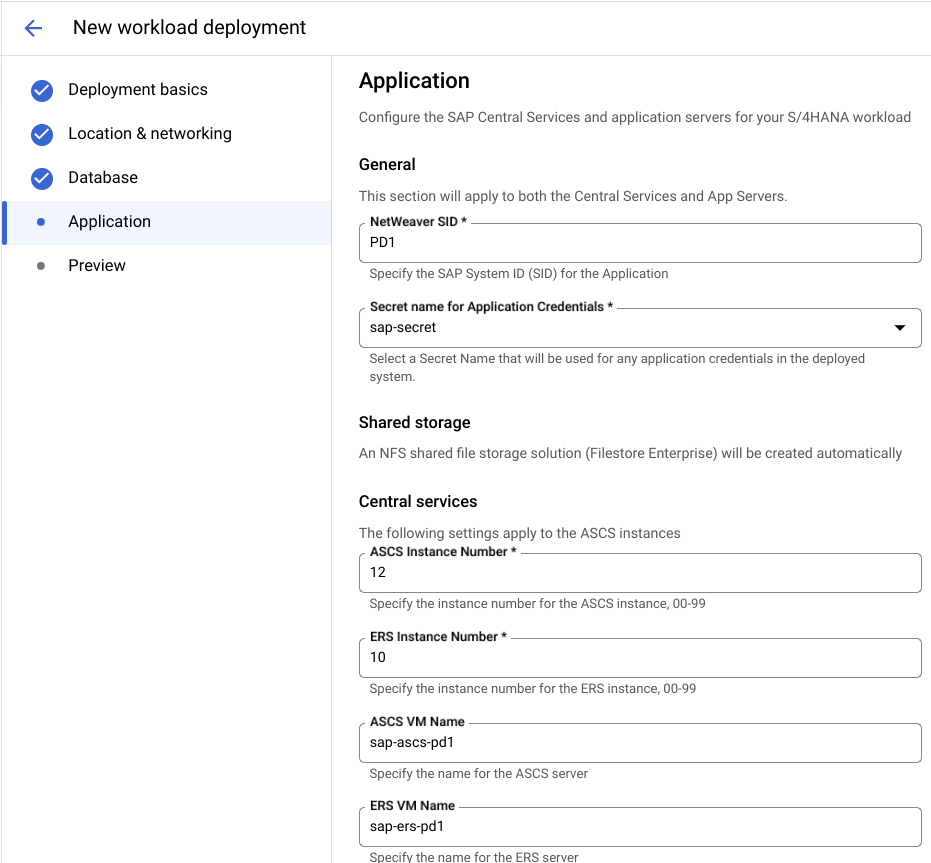
In addition to choosing from the list of certified machine shapes, you will also specify how many application servers should be deployed in each zone.
Preview Tab:
The final page summarizes your selections and also performs some additional proactive checks for things like quotas to prevent failures from occurring later in the process. You will also see a list of the required APIs and services that are needed in the deployment.
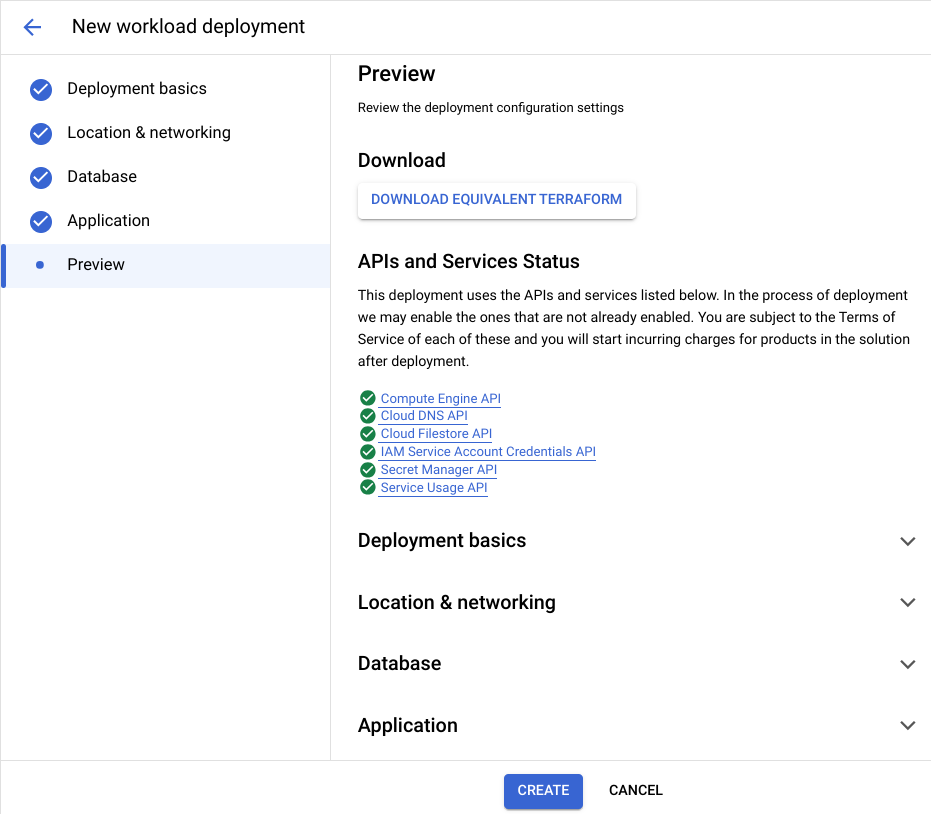
You can click Download Equivalent Terraform if you wish to generate and download the equivalent Infrastructure as Code to deploy in your existing automation pipeline or customize further, or you can click Create at the bottom of the page to start the deployment in the console.
Clicking Create will take you back to the deployment dashboard. You will receive a notification when the deployment has finished, which may take between 2-3 hours to complete. You can track the status and view real-time logs by clicking on the deployment and then the links for either the Terraform log or Ansible log on the subsequent screen.Post-deployment tasks
After the deployment has finished, you can connect to your SAP S/4HANA system using standard tooling such as HANA Studio or the SAP GUI by connecting using the information specified during the configuration process. View the documentation for additional information on connecting to your system.
Learn more
We’ve created a seven-minute overview and demo video that shows the above steps in action. You can also reference our public documentation for additional information on the service and how to start using it.
If you have any questions or would like to request functionality or discuss the roadmap, please contact your account manager or support team.

