The error “could not open lock file /var/lib/dpkg/lock-frontend” is standard on Ubuntu.
It happens when the system runs multiple commands that need the same file, often the /var/lib/dpkg/lock file.
The /var/lib/dpkg/lock file is vital for Ubuntu’s apt package manager. It manages package installation, upgrades, and removal.
Updates and installations fail when this file is locked or unavailable, causing the error.
Follow this guide to fix Ubuntu’s “Could not get lock /var/lib/dpkg/lock” error.
Requirements
- Access to the terminal
- A user account with sudo or root rights
- An Ubuntu system (tested on Ubuntu 22.04)
Why the Error Happens?
The “Could not get lock /var/lib/dpkg/lock” error appears when two processes try to use the /var/lib/dpkg/lock file simultaneously.
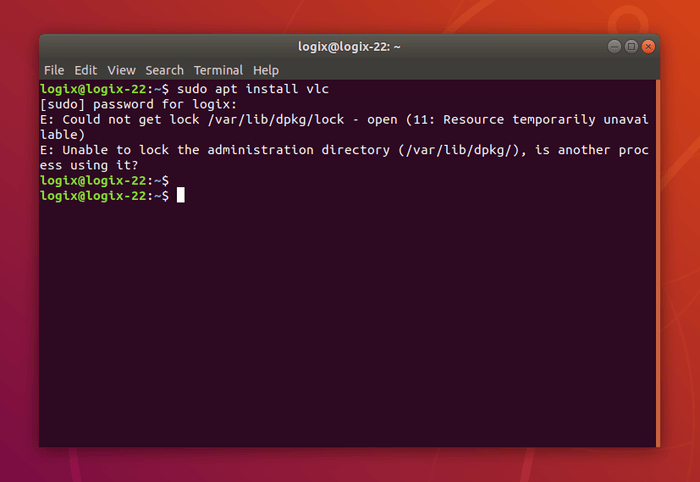
A standard version of the error looks like this:
E: Could not get lock /var/lib/dpkg/lock – open (11 Resources temporarily unavailable)
E: Unable to lock the administration directory (/var/lib/dpkg/), is another process using it?
Another error sometimes seen in recent Ubuntu versions is:
The cache lock is active: Unable to access /var/lib/dpkg/lock-frontend. Process 5017 (apt) is holding it.
The error can also appear as follows:
E: Could not get lock var/lib/dpkg/lock-frontend – open (11: Resource temporarily unavailable)
E: Unable to acquire the dpkg frontend lock (/var/lib/dpkg/lock-frontend). Is another process using it?
Common Causes of the Error
- Damaged package manager files: Issues with essential package management files make them inaccessible or unchangeable. Problems like software bugs or file system errors cause this.
- Multiple package manager tasks: Running various package managers, such as apt, apt-get, or dpkg, simultaneously leads to file access conflicts. Users cause these issues by starting several installs or updates at once. Lock files prevent such conflicts.
- Background tasks using the package manager: Errors occur if an automated process, such as system updates, uses the package manager while the user tries to run it manually.
- Unfinished or interrupted operations: Errors appear if an update or installation stops midway, often due to power outages, system reboots, or manually ending the process.
How to Fix the Could Not Get Lock Error in Ubuntu?
The Could not get lock /var/lib/dpkg/lock error happens when Ubuntu’s update system or the dpkg/apt service cannot access lock files.
Ubuntu starts an update process by default, causing lock files to avoid conflicts between operations. The system cannot update or install software if the lock is unavailable.
This error can block crucial tasks, leaving software outdated and vulnerable. Below are solutions to resolve it:
Method 1: Check Active Applications
Ensure no other applications, such as Software Updater, are installing or updating packages.
Look at open terminal windows to verify no package management tasks are running. If you find ongoing processes, wait for them to complete before proceeding.
Method 2: Wait for Background Processes
Sometimes, the issue is temporary. Wait for 10 minutes to allow background processes to finish. After waiting, try rerunning the package manager.
Method 3: Restart the System
If the error continues, restart your computer. Rebooting clears any active locks and resets the system. Use the following command to restart:
reboot
Restart the system and check if installing or updating works without the error.
Method 4: Clear Cache
Interrupted installations or updates can cause errors. The system stores required files in a cache before applying changes during these processes.
When the process stops unexpectedly, incomplete or corrupted cache files may remain. Remove old cache files to fix the Could not get lock /var/lib/dpkg/lock error.
Run the following command:
sudo apt clean
This command removes all cached files stored in /var/cache/apt/archives/. It helps resolve conflicts caused by incomplete package operations.
Method 5: Update Software
Outdated software may lead to errors. Ensure the system uses the latest software to resolve issues.
First, update the software list:
sudo apt update
Then, upgrade the installed software:
sudo apt upgrade
Method 6: Adjust Automatic Updates
Automatic updates can conflict with manual package management, causing errors. Change the update settings to reduce conflicts.
Follow these steps:
- Click the Show Applications icon.
- Search for Updates.
- Open Software & Updates.
- Go to the Updates tab.
- Modify automatic update settings.
You can adjust the frequency or turn off updates temporarily to check for conflicts. However, enabling automatic security updates is recommended for system safety.
Method 7: Check Running Processes
Ongoing updates or installations may keep the lock in use, causing errors. To identify such processes:
Check processes using apt:
ps aux | grep -i apt
Wait for the process to finish or terminate unnecessary ones.
Check dpkg processes:
ps aux | grep -i dpkg
Terminate unwanted processes to prevent conflicts.
Method 8: Inspect Lock Files
Lock files prevent multiple instances of apt or dpkg from running simultaneously. Examples include:
- /var/lib/dpkg/lock
- /var/lib/dpkg/lock-frontend
- /var/lib/apt/lists/lock
Use the lsof command to check if a lock file is in use:
sudo lsof [lock_file_name]
For example, check the /var/lib/dpkg/lock file:
sudo lsof /var/lib/dpkg/lock
If a service is using the file, the output shows its PID.
Method 9: Stop Stuck Services
If an apt or dpkg service is stuck, terminate it using its PID.
- Find the PID:
ps aux | grep -i dpkg
- Terminate the process:
sudo kill [PID]
To force termination, use the -9 option:
sudo kill -9 [PID]
Recheck to ensure the service is no longer running:
ps aux | grep -i dpkg
The command produces no output, but it likely resolves the issue.
Method 10: Remove Lock Files
If other methods do not work, remove the lock files. Use the rm command to delete them.
Remove the /var/lib/dpkg/lock file:
sudo rm /var/lib/dpkg/lock
Delete the /var/lib/apt/lists/lock file:
sudo rm /var/lib/apt/lists/lock
Remove the /var/lib/dpkg/lock-frontend file:
sudo rm /var/lib/dpkg/lock-frontend
Delete the /var/cache/apt/archives/lock file:
sudo rm /var/cache/apt/archives/lock
These commands do not display any output but will resolve the issue.
Repair Broken Packages
After removing the lock files, fix broken packages. This step completes interrupted installations, resolves dependencies, and ensures the package manager works appropriately.
Doing this helps prevent the “Could not get lock /var/lib/dpkg/lock” error from recurring.
Run the following command to repair broken packages:
sudo dpkg –configure -a
The post How To Fix could not open lock file /var/lib/dpkg/lock-frontend Error? appeared first on About Chromebooks.