Using a computer involves repeated clicking, which can feel tiring. Clicking with a touchpad, built-in mouse, or external mouse often causes finger strain.
An auto clicker becomes useful for gamers and those working with documents, images, or websites. Chromebook users can explore auto clickers, their functions, and their benefits.
What Does an Auto Clicker Do?
An auto clicker automates mouse clicks when the cursor stays stile. It helps perform continuous clicks during games or tasks that need repeated clicking.
With this tool, users can save time, focus on other activities, and let the computer handle clicking automatically. The software can click as many times as necessary to complete tasks.
Auto clickers are intelligent tools that simulate mouse clicks. They activate when the cursor remains idle for a few seconds, allowing faster and more effortless operation than manual clicking.
Auto Clicker for Chromebook
Chromebook users also deal with tasks requiring rapid and frequent clicking. Installing an auto clicker increases click speed, reduces effort, and improves productivity on Chrome apps.
This tool operates more efficiently than a physical mouse. It takes over clicking when your mouse pauses, offering automated functionality.
Auto clickers designed for Chromebooks are compatible with Chrome OS. They perform the same tasks as those for other systems, such as repetitive clicking for gaming or web-based tasks.
Common Uses of Auto Clicker on Chromebook
Auto clickers are helpful for many Chromebook tasks, including:
- Gaming: Frequent clicks during games become faster and more accurate with an auto clicker, improving performance.
- Refreshing Web Pages: Automatically reloads pages, saving time and effort.
- Online Shopping: Helps secure discounts on flash sale websites that require quick clicks.
- Keeping Active: Maintains activity on your Chromebook when you’re away, preventing it from appearing idle.
- Data Entry: Simplifies tasks like moving between cells or copying and pasting data in Google Sheets.
- Other Tasks: Useful for browsing e-books, photos, or web pages.
Features of Auto Clickers
Key features include:
- Low CPU usage
- Portable software extensions
- Free and open-source tools
- Clean user interface
- Ad and malware-free functionality
- Cursor tracking and single-spot clicking
- Customizable click settings
Benefits of Using an Auto Clicker on Chromebook
Auto clickers offer several advantages:
- Versatility: Works with most apps and web pages.
- Ease of Use: Simple setup suitable for beginners.
- Energy Savings: Reduces physical strain and effort.
- Speed: Allows faster completion of repetitive tasks.
- Accessibility: Helps users with motor impairments.
How to Download and Install an Auto Clicker for Chromebook?
You can use either the built-in auto clicker or download an external one.
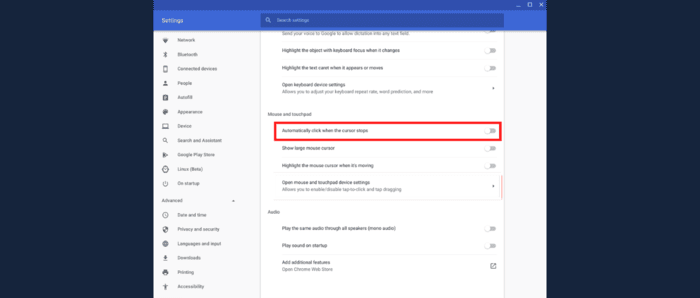
Method 1: Built-In Auto Clicker
- Press Alt + Shift + s or open Time Settings.
- Select “Advanced” under Accessibility.
- Enable “Automatically click” in the Mouse and Touchpad settings.
Method 2: Auto Clicker via Chrome Extensions
- Open Chrome settings and go to “Extensions.”
- Access the Chrome Web Store.
- Search for “Auto Clicker” and add your preferred option to Chrome.
Auto clickers from extensions often provide more features than the built-in option, such as advanced settings for customization.
Customizing an Auto Clicker on a Chromebook
You can adjust the features of the auto clicker on your Chromebook if the default settings don’t suit your needs. Here’s how to modify key settings:
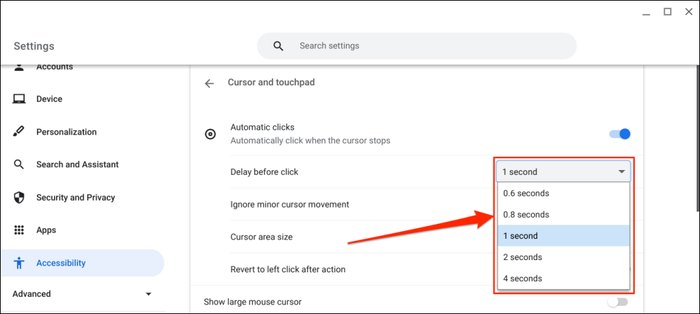
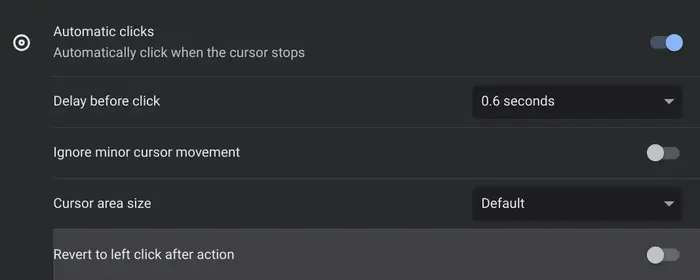
- Click Delay: Change when the cursor stays idle before the auto clicker activates. Go to the ‘Mouse and Touchpad’ settings, select “Delay,” and choose a time between 0.6 and 4 seconds.
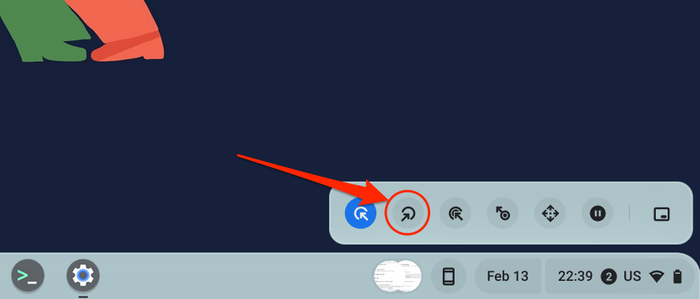
- Fixed Click Location: Enable “Stabilize click location” to keep the click ring stationary until you move the cursor outside the ring.
- Reset to Left-Click: Turn on “Revert to left click after action” to reset to left-click after performing actions like right-clicks or double-clicks.
- Movement Threshold: Set the number of cursor moves before the auto clicker starts clicking. Adjust this setting to match your task needs.
Standard Auto Clickers for Chromebook
Here are some commonly used auto clickers for Chromebooks, including their features and limitations:
- GS Auto Clicker: Simple to set up with settings for click sequences and shortcuts. Limited advanced functions are available.
- AutoClicker by MurGaa.com: Allows users to set click intervals and create detailed sequences. You may need to purchase a license.
- Click Assistant: Android app with swipe gestures and click point setup. Some features may depend on your Chromebook’s hardware.
- Auto Clicker – Automatic Tap: A simple Android app for repetitive tasks without advanced customization.
- Chromebook Auto Clicker Extension: Designed for browser use, it integrates seamlessly with Chrome but doesn’t work for desktop apps.
Security Tips for Auto Clickers
- Use Trusted Sources: Download only from the Chrome Web Store or official websites.
- Check Permissions: Avoid tools requesting access to sensitive data.
- Update Regularly: Keep your software and Chrome OS updated.
- Monitor Performance: Look out for slow performance or unusual behavior.
- Back-Up Data: Protect important files using cloud or external storage.
Following these steps, you can safely customize and use an auto clicker on your Chromebook while avoiding security risks.
The post How Auto Clicker Works on Chromebook? appeared first on About Chromebooks.

