Generative AI (genAI) is seemingly everywhere these days — and Windows is certainly no exception.
The OS itself now has Copilot on its taskbar, and new PCs ship with a dedicated Copilot AI key on their keyboards. Microsoft is adding more and more genAI features as time goes by and it’s increasingly hard to search the web without getting a genAI answer from Google and other search engines.
I’ve heard from people who love the technology, and I’ve heard from people who can’t stand it. Me, I’m right here in the middle: I keep experimenting with it, but articles like this one are 100% written by a real-life human. Personally, I want to see genAI features when I choose — certainly not all the time, everywhere on my computer.
Plain and simple, you might occasionally use genAI tools to get work done, but that doesn’t necessarily mean you want to be bombarded with it everywhere. That’s what these tips are all about: easy ways to eliminate the AI elements integrated throughout Windows and Chrome or whatever other web browser you’re using. It’s your computer, your workday, and your online experience.
Time to take back control.
Want more Windows PC tips? Sign up for my free Windows Intelligence newsletter. Plus, get free Windows Field Guide downloads as a bonus when you sign up!
The Windows AI asterisk
First, a quick bit of pertinent perspective: Despite all the hype, most Windows AI features aren’t actually doing anything in the background. They usually don’t do anything at all, in fact, until you click a button to summon them.
For example, the Microsoft Paint app has a built-in AI image generator tool. It does nothing whatsoever unless you open Paint and click the “Image Creator” button on the toolbar. Then, it will generate an image for you.
If you don’t want to use that image feature, just don’t click that button. If you don’t want to see the button, don’t launch Microsoft Paint. Most genAI features in Windows are exactly like that — so far.
But there are some AI features that are getting awfully insistent. So let’s get out the proverbial weedwhacker and trim them back.
Windows AI elimination step #1: Start with Google
Most genAI features lay low unless you go looking for them; Google’s AI answers are an in-your-face exception. You’ll often get answers written by Google’s Gemini AI just when searching Google, whether you want them or not.
There are many ways to avoid AI answers on Google. Here’s a quick list:
- After searching for something on Google, click the “Web” category. You’ll only see web links.
- Add the text -ai to any search to hide AI answers.
- Install the simple “Hide Google AI Overviews” Chrome extension to hide AI answers. This extension should work on other Chromium-based browsers like Edge, Brave, and Vivaldi. It’s available for Firefox, too.
You can also create a custom search engine in Chrome to default to Google web searches. Here’s a guide to getting rid of Gemini with a custom search engine in Chrome — on both computers running Google Chrome and Android phones.
Windows AI elimination step #2: Hide Copilot
Microsoft’s Copilot AI chatbot app now comes pinned to the taskbar by default in both Windows 10 and Windows 11. It’s just one click away.
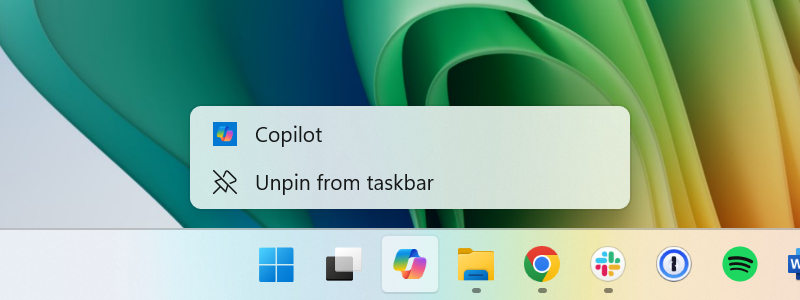
If you don’t want it down there, getting rid of it is easy — and the latest version of Copilot makes it even easier: Just right-click the Copilot taskbar icon and select “Unpin from taskbar.” That’s it.
Copilot doesn’t actually do anything until you open it and ask it a question, so it won’t do anything on your PC as long as you leave it closed. You can also opt to completely uninstall it, though, if you like: Just open the Start menu, search for “Copilot,” then right-click the “Copilot” shortcut and select “Uninstall.”

Chris Hoffman, IDG
Windows AI elimination step #3: Reclaim the Copilot key
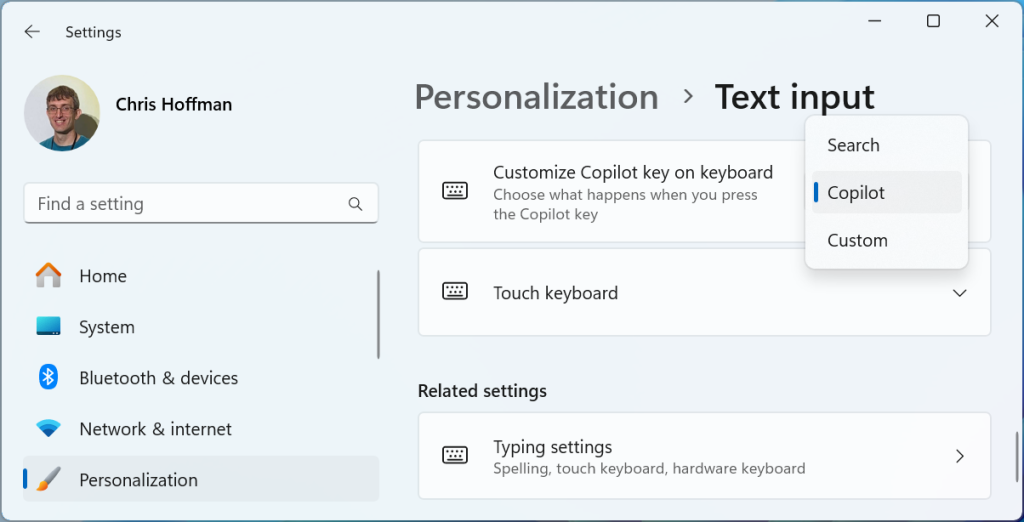
All on-screen implementations aside, many new laptops now come with an actual physical Copilot key on their keyboards. That key will launch Microsoft’s AI chatbot — and it’s easy to accidentally tap. But you can stop it.
To do so, open the Settings app on your Windows 11 PC, select “Personalization,” and then choose “Text input.” Scroll down to the “Customize Copilot key on keyboard” option. You can set it to “Search” to use it as a search key instead, similar to what’s present on Chromebooks.
(You can also make it launch a different app — like the ChatGPT app, for example — if you’d prefer.)

Chris Hoffman, IDG
Windows AI elimination step #4: Tackle the toolbar
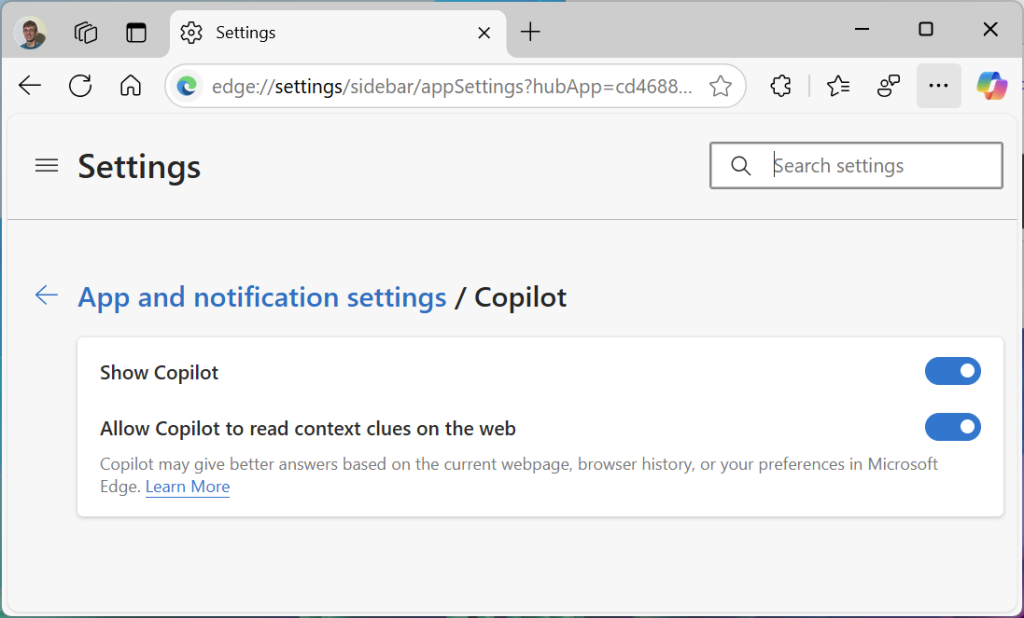
If you prefer using Microsoft’s web browser, you’ll notice it has a big Copilot AI chatbot icon right on its toolbar. You can get rid of that, too.
To remove Copilot from Edge’s toolbar:
- Click the menu button at the top-right corner of the Edge browser window and select “Settings.”
- Click ”Copilot and sidebar” in the left pane.
- Click the “Copilot” app under “App and notification settings.”
- Turn off the “Show Copilot” option.

Chris Hoffman, IDG
Windows AI elimination step #5. Total Recall removal
While I’ve mentioned that most AI features on Windows don’t do anything unless you launch them, the one exception is the Windows Recall feature — which runs in the background and saves snapshots of your PC’s screen so you can search your PC usage later. Bear in mind, this is only on new “Copilot+ PCs,” and it’s disabled by default. Also: Your Recall data is never sent to Microsoft — it’s processed entirely on your PC.
At the moment (in January 2025), Recall is only available in Insider versions of Windows 11. Of course, it will almost certainly come to all Copilot+ PCs at some point this year.
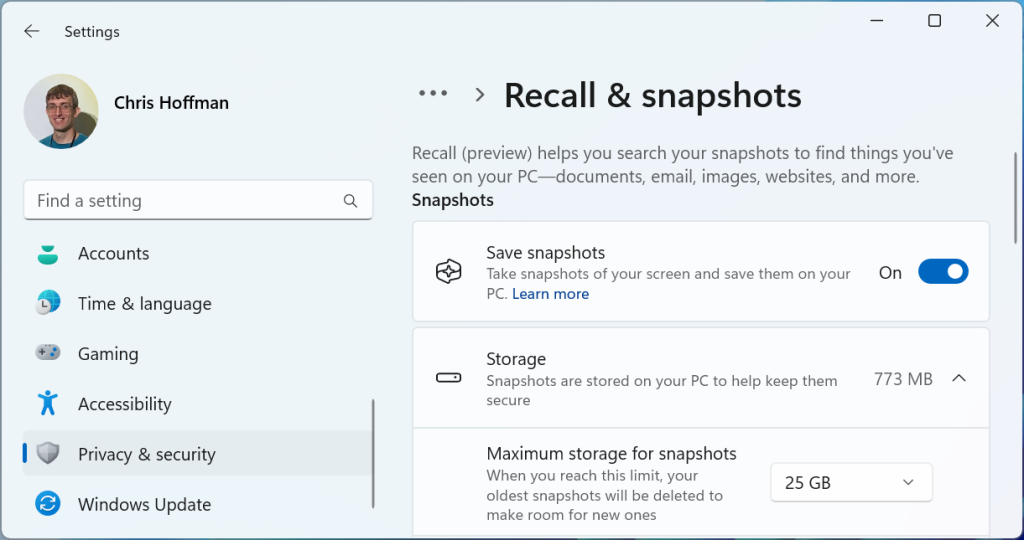
You can check whether the Recall feature is active on Windows 11 by opening the Settings app, selecting “Privacy & security,” and clicking “Recall & snapshots” under Windows permissions. From here, you can turn off “Save snapshots” if you don’t want the AI-powered Recall feature capturing snapshots in the background.
Don’t see anything about “Recall & snapshots” in the Settings app? That means your Windows PC doesn’t have Recall. Most Windows PCs don’t!

Chris Hoffman, IDG
Choose your own AI adventure
Remember: AI doesn’t have to be all or nothing. You might prefer a traditional Google search experience and a Copilot-free Windows desktop, but you might still launch the ChatGPT app now and then or use whatever AI tools your workplace provides.
The choice is yours — and now, you know exactly how to make it happen.
Let’s stay in touch! Sign up for my free Windows Intelligence newsletter. You’ll get three new things to try every Friday. Plus, I’ll send you free in-depth Windows Field Guides as a special welcome bonus.

